ラベル CentOS8 の投稿を表示しています。 すべての投稿を表示

【Linux】Neovimのインストールと設定(viでPHP+Laravel開発)

Neovim

Neovimのインストール
# dnf -y install neovim
プラグインマネージャのインストール
# curl -fLo ~/.local/share/nvim/site/autoload/plug.vim --create-dirs \
     https://raw.githubusercontent.com/junegunn/vim-plug/master/plug.vim
設定
# mkdir -p ~/.config/nvim
# vi ~/.config/nvim/init.vim
" ===== 基本設定 =====
set number
set relativenumber
set tabstop=4
set shiftwidth=4
set expandtab
set cursorline
syntax on

" ===== プラグイン =====
call plug#begin('~/.config/nvim/plugged')

Plug 'jwalton512/vim-blade'       " Bladeハイライト
Plug 'neoclide/coc.nvim', {'branch': 'release'}  " LSP補完
Plug 'dense-analysis/ale'         " 非同期Lint
Plug 'tpope/vim-fugitive'         " Git

call plug#end()

" ===== coc.nvim =====
let g:coc_global_extensions = ['coc-phpls']

" ===== ALE =====
let g:ale_linters = {'php': ['phpcs', 'phpstan']}
let g:ale_fixers = {'php': ['phpcbf']}
let g:ale_fix_on_save = 1

" ===== キーバインド =====
inoremap   pumvisible() ? "\" : "\"
inoremap   pumvisible() ? "\" : "\":wq
エイリアス設定
# echo "alias vi='nvim'" >> ~/.bashrc
# source ~/.bashrc
プラグインのインストール
# vi
:PlugInstall

CentOS8でサーバー構築 - 12.不正アクセスブロック(fail2ban)

fail2banのインストール

インストール
# dnf -y install fail2ban

fail2banの設定

設定
# cp /etc/fail2ban/jail.conf /etc/fail2ban/jail.local
# vi /etc/fail2ban/jail.local
# "bantime" is the number of seconds that a host is banned.
bantime  = 1d

# A host is banned if it has generated "maxretry" during the last "findtime"
# seconds.
findtime  = 1h

# "maxretry" is the number of failures before a host get banned.
maxretry = 3
・
・
# Destination email address used solely for the interpolations in
# jail.{conf,local,d/*} configuration files.
destemail = root

# Sender email address used solely for some actions
sender = root

# E-mail action. Since 0.8.1 Fail2Ban uses sendmail MTA for the
# mailing. Change mta configuration parameter to mail if you want to
# revert to conventional 'mail'.
mta = postfix
・
・
#
# Action shortcuts. To be used to define action parameter

# Default banning action (e.g. iptables, iptables-new,
# iptables-multiport, shorewall, etc) It is used to define
# action_* variables. Can be overridden globally or per
# section within jail.local file
#banaction = iptables-multiport
banaction = firewallcmd-ipset

#banaction_allports = iptables-allports
banaction_allports = firewallcmd-allports
・
・
#
# SSH servers
#

[sshd]
enabled = true
・
・
#
# HTTP servers
#

[apache-auth]
enable = true
・
・
[postfix]
enabled = true
・
・
[postfix-sasl]
enabled   = true
・
・
# dovecot defaults to logging to the mail syslog facility
# but can be set by syslog_facility in the dovecot configuration.
[dovecot]
enabled = true

fail2banの起動

起動
# systemctl start fail2ban
# systemctl enable fail2ban
設定を変更した時などクライアントリロード
#  fail2ban-client reload

fail2banの動作確認

sshd
# fail2ban-client status sshd
Status for the jail: sshd
|- Filter
|  |- Currently failed: 0
|  |- Total failed:     0
|  `- Journal matches:  _SYSTEMD_UNIT=sshd.service + _COMM=sshd
`- Actions
   |- Currently banned: 0
   |- Total banned:     0
   `- Banned IP list:
postfix-sasl
# fail2ban-client status postfix-sasl
Status for the jail: postfix-sasl
|- Filter
|  |- Currently failed: 16
|  |- Total failed:     505
|  `- Journal matches:  _SYSTEMD_UNIT=postfix.service
`- Actions
   |- Currently banned: 2
   |- Total banned:     2
   `- Banned IP list:   <BANされたIPアドレス>

その他

個別にBAN設定
# fail2ban-client -v set postfix-sasl banip xxx.xxx.xxx.0/24

CentOS8でサーバー構築 - 11.PHPでMemcached

DBへの接続は極力少なくして、キャッシュセッションはMemcachedを使いましょう。
って事でインストール。

Memcachedのインストール

Memcachedインストール
# dnf -y install memcached php-pecl-memcached
milter-manager_repos                                                                347  B/s | 819  B     00:02
milter-manager_repos-source                                                         446  B/s | 819  B     00:01
Dependencies resolved.
=====================================================
 Package                 Architecture    Version                        Repository             Size
======================================================
Installing:
 memcached           x86_64          1.5.9-3.el8           AppStream         132 k
 php-pecl-memcached      x86_64      3.1.5-1.el8.remi.7.4   remi-modular    96 k
Installing dependencies:
 fastlz        x86_64          0.1.0-0.12.20070619svnrev12.el8     epel        15 k
 libmemcached-libs       x86_64      1.0.18-15.el8          AppStream        137 k
 php-pecl-igbinary       x86_64      3.1.2-1.el8.remi.7.4       remi-modular      158 k
 php-pecl-msgpack        x86_64      2.1.0-1.el8.remi.7.4       remi-modular       65 k

Transaction Summary
=======================================================
Install  6 Packages
  epel、remiリポジトリを使用するので、使えるようにしておく事。

Memcachedの設定

Memcached設定
# vi /etc/sysconfig/memcached
PORT="11211"
USER="memcached"
MAXCONN="512"
CACHESIZE="64"
OPTIONS="-l 127.0.0.1"
phpのMemcached設定
# vi /etc/php.d/50-memcached.ini
;  Use memcache as a session handler
session.save_handler=memcached
;  Defines a comma separated list of server urls to use for session storage
session.save_path="localhost:11211"
# vi /etc/php.ini
[Session]
; Handler used to store/retrieve data.
; http://php.net/session.save-handler
;session.save_handler = files
memcached起動
# systemctl start memcached
# systemctl enable memcached
Created symlink /etc/systemd/system/multi-user.target.wants/memcached.service → /usr/lib/systemd/system/memcached.service.
Apache再起動
# systemctl restart httpd

Firewalledの設定

Firewalled設定
# firewall-cmd --add-port=11211/tcp --zone=public --permanent
# firewall-cmd --reload
下記の様なエラーが出て起動できず。
OPTIONS="-l 127.0.0.1"
と修正して解決。
systemctl status memcached
● memcached.service - memcached daemon
   Loaded: loaded (/usr/lib/systemd/system/memcached.service; enabled; vendor preset: disabled)
   Active: failed (Result: exit-code) since Fri 2020-07-17 09:30:49 JST; 2min 21s ago
  Process: 446015 ExecStart=/usr/bin/memcached -p ${PORT} -u ${USER} -m ${CACHESIZE} -c ${MAXCONN} $OPTIONS (code=e>
 Main PID: 446015 (code=exited, status=71)

Jul 17 09:30:49 kowloonet.net systemd[1]: Started memcached daemon.
Jul 17 09:30:49 kowloonet.net memcached[446015]: bind(): Cannot assign requested address
Jul 17 09:30:49 kowloonet.net memcached[446015]: failed to listen on TCP port 11211: Cannot assign requested address
Jul 17 09:30:49 kowloonet.net systemd[1]: memcached.service: Main process exited, code=exited, status=71/OSERR
Jul 17 09:30:49 kowloonet.net systemd[1]: memcached.service: Failed with result 'exit-code'.

CentOS8でサーバー構築 - 9.mailmanのインストールと設定(Postfix)

メールホストkowloonet.net
URLホストadmin.kowloonet.net
URLhttps://admin.kowloonet.net/mailman/admin/
で設定します。

mailmanのインストール

mailmanインストール
# dnf -y install mailman

mailmanの設定

mm_cfg.pyの編集
# vi /etc/mailman/mm_cfg.py
DEFAULT_URL_HOST   = 'kowloonet.net'
DEFAULT_EMAIL_HOST = 'kowloonet.net'
Defaults.pyの編集
# vi /usr/lib/mailman/Mailman/Defaults.py
# Mailman needs to know about (at least) two fully-qualified domain names
# (fqdn); 1) the hostname used in your urls, and 2) the hostname used in email
# addresses for your domain.  For example, if people visit your Mailman system
# with "http://www.dom.ain/mailman" then your url fqdn is "www.dom.ain", and
# if people send mail to your system via "yourlist@dom.ain" then your email
# fqdn is "dom.ain".  DEFAULT_URL_HOST controls the former, and
# DEFAULT_EMAIL_HOST controls the latter.  Mailman also needs to know how to
# map from one to the other (this is especially important if you're running
# with virtual domains).  You use "add_virtualhost(urlfqdn, emailfqdn)" to add
# new mappings.
#
# If you don't need to change DEFAULT_EMAIL_HOST and DEFAULT_URL_HOST in your
# mm_cfg.py, then you're done; the default mapping is added automatically.  If
# however you change either variable in your mm_cfg.py, then be sure to also
# include the following:
#
#     add_virtualhost(DEFAULT_URL_HOST, DEFAULT_EMAIL_HOST)
#
# because otherwise the default mappings won't be correct.
DEFAULT_EMAIL_HOST = 'kowloonet.net'
DEFAULT_URL_HOST = 'admin.kowloonet.net'
DEFAULT_URL_PATTERN = 'https://%s/mailman/'
# MTA -- but then also see POSTFIX_STYLE_VIRTUAL_DOMAINS.
MTA = 'Postfix'
・
・
# The default language for this server.  Whenever we can't figure out the list
# context or user context, we'll fall back to using this language.  See
# LC_DESCRIPTIONS below for legal values.
DEFAULT_SERVER_LANGUAGE = 'ja'
・
・
# Set this variable to Yes to allow list owners to delete their own mailing
# lists.  You may not want to give them this power, in which case, setting
# this variable to No instead requires list removal to be done by the site
# administrator, via the command line script bin/rmlist.
OWNERS_CAN_DELETE_THEIR_OWN_LISTS = Yes
・
・
# These format strings will be expanded w.r.t. the dictionary for the
# mailing list instance.
DEFAULT_SUBJECT_PREFIX  = "[%(real_name)s: %%d] "

# What should happen to non-member posts which are do not match explicit
# non-member actions?
# 0 = Accept
# 1 = Hold
# 2 = Reject
# 3 = Discard
DEFAULT_GENERIC_NONMEMBER_ACTION = 0
・
・
# Mailman can be configured to "munge" Reply-To: headers for any passing
# messages.  One the one hand, there are a lot of good reasons not to munge
# Reply-To: but on the other, people really seem to want this feature.  See
# the help for reply_goes_to_list in the web UI for links discussing the
# issue.
# 0 - Reply-To: not munged
# 1 - Reply-To: set back to the list
# 2 - Reply-To: set to an explicit value (reply_to_address)
DEFAULT_REPLY_GOES_TO_LIST = 0
・
・
# SUBSCRIBE POLICY
# 0 - open list (only when ALLOW_OPEN_SUBSCRIBE is set to 1) **
# 1 - confirmation required for subscribes
# 2 - admin approval required for subscribes
# 3 - both confirmation and admin approval required
#
# ** please do not choose option 0 if you are not allowing open
# subscribes (next variable)
DEFAULT_SUBSCRIBE_POLICY = 2
・
・
 Are archives on or off by default?
DEFAULT_ARCHIVE = Off
・
・
# Will list be available in digested form?
DEFAULT_DIGESTABLE = No
エイリアス作成
# /usr/lib/mailman/bin/genaliases
管理者パスワード作成
# /usr/lib/mailman/bin/mmsitepass
管理用メーリングリスト作成
# /usr/lib/mailman/bin/newlist mailman
Enter the email of the person running the list: example@example.com
Initial mailman password:
Hit enter to notify mailman owner...
パーミッション修正
# /usr/lib/mailman/bin/check_perms -f
/etc/mailman/aliases bad group (has: root, expected mailman) (fixing)
/etc/mailman/adm.pw bad group (has: root, expected mailman) (fixing)
/usr/lib/mailman/Mailman/Defaults.pyc bad group (has: root, expected mailman) (fixing)
/usr/lib/mailman/Mailman/mm_cfg.pyc bad group (has: root, expected mailman) (fixing)
/var/log/mailman/error bad group (has: root, expected mailman) (fixing)
Problems found: 5
Re-run as mailman (or root) with -f flag to fix
# chown apache /etc/mailman/aliases
# chmod 664 /etc/mailman/aliases*
# chmod 2775 /etc/mailman
パーミッション修正確認
# /usr/lib/mailman/bin/check_perms
No problems found
mailman起動と自動起動設定
# systemctl enable --now mailman
# /usr/lib/mailman/bin/newlist mailman
Enter the email of the person running the list: example@example.com
Initial mailman password:
postalias: fatal: open /etc/mailman/aliases.db: Permission denied
Traceback (most recent call last):
  File "/usr/lib/mailman/bin/newlist", line 274, in 
    main()
  File "/usr/lib/mailman/bin/newlist", line 240, in main
    sys.modules[modname].create(mlist)
  File "/usr/lib/mailman/Mailman/MTA/Postfix.py", line 342, in create
    _update_maps()
  File "/usr/lib/mailman/Mailman/MTA/Postfix.py", line 78, in _update_maps
    raise RuntimeError, msg % (acmd, status, errstr)
RuntimeError: command failed: /usr/sbin/postalias /etc/mailman/aliases (status: 1, Operation not permitted)
などとエラーが出た場合は。
# /usr/lib/mailman/bin/check_perms -f
を実行してパーミッションを修正する。
管理者パスワードの変更
/usr/lib/mailman/bin/mmsitepass
メーリングリストの削除
# /usr/lib/mailman/bin/rmlist メーリングリスト名

Postfixの設定

mailman起動とサービス追加
# vi /etc/postfix/main.cf
#alias_maps = dbm:/etc/aliases
#alias_maps = hash:/etc/aliases
#alias_maps = hash:/etc/aliases, nis:mail.aliases
#alias_maps = netinfo:/aliases
alias_maps = hash:/etc/aliases, hash:/etc/mailman/aliases
・
・
#alias_database = dbm:/etc/aliases
#alias_database = dbm:/etc/mail/aliases
#alias_database = hash:/etc/aliases
#alias_database = hash:/etc/aliases, hash:/opt/majordomo/aliases
alias_database = hash:/etc/aliases, hash:/etc/mailman/aliases
postfix再起動
 # systemctl restart postfix

Apacheの設定

mailman.confや他の .confを状況に応じて修正後Apache再起動
mailman.conf
# cd /etc/httpd/conf.d/
# cp mailman.conf mailman.conf.org
# vi mailman.conf
Apache再起動
# httpd -t
Syntax OK
# systemctl restart httpd

ブラウザでアクセス

https://ホスト名/mailman/admin/
にアクセス。

【CentOS8】クローラ拒否設定(robots.txt .htaccess)

DocumentRoot /var/www/dev の場合

robots.txtでクローラ拒否

# vi /var/www/dev/robots.txt
User-Agent:*
Disallow:/

.htaccessでクローラ拒否

httpd.conf に記述してもOK。
# vi /var/www/dev/.htaccess
SetEnvIf User-Agent "Googlebot" ng_ua
SetEnvIf User-Agent "bingbot" ng_ua
order Allow,Deny
Allow from all
Deny from env=ng_ua

【CentOS8】Ruby2.7.1のインストール

dnfでもRubyはインストールできますが、2.5.5とバージョンが古いので、
rbenvを使って最新のRuby2.7.1をインストールします。
# dnf list avialable ruby
milter-manager_repos                                                                406  B/s | 819  B     00:02
milter-manager_repos-source                                                         400  B/s | 819  B     00:02
Available Packages
ruby.i686                               2.5.5-105.module_el8.1.0+214+9be47fd7                              AppStream
ruby.x86_64                             2.5.5-105.module_el8.1.0+214+9be47fd7                              AppStream

rbenvのインストール

CentOS8インストール時におおよそのもの、git、openssl-develなどはデフォルトで入っています。
こちらの環境で必要なものは readline-devel、nodejsでした。
必要なパッケージインストール
# yum -y install readline-devel nodejs
epelリポジトリが追加されていない場合は追加。
epelリポジトリの追加
# dnf -y install epel-release
rbenvをダウンロード
# git clone https://github.com/rbenv/rbenv.git ~/.rbenv
Pathなどを追加
# echo 'export PATH="~/.rbenv/bin:$PATH"' >> ~/.bash_profile
# echo 'eval "$(rbenv init -)"' >> ~/.bash_profile
# source ~/.bash_profile
rbenv intすると、下記のメッセージが。
# Load rbenv automatically by appending
# the following to ~/.bash_profile:

eval "$(rbenv init -)"
手動でやるな、自動でやれと。
rbenvバージョン確認
# rbenv -v
rbenv 1.1.2-30-gc879cb0

Rubyのインストール

Ruby最新バージョン確認
# rbenv install --list
2.5.8
2.6.6
2.7.1
jruby-9.2.11.1
maglev-1.0.0
mruby-2.1.1
rbx-5.0
truffleruby-20.1.0

Only latest stable releases for each Ruby implementation are shown.
Use 'rbenv install --list-all' to show all local versions.
Rubyインストール
# rbenv install 2.7.1
使用するRubyのバージョン指定
# rbenv global 2.7.1
# rbenv rehash
rbenvでバージョンを指定してやらないと下記のメッセージ。
# ruby -v
rbenv: ruby: command not found

The `ruby' command exists in these Ruby versions:
  2.7.1
Rubyバージョン確認
# ruby -v
ruby 2.7.1p83 (2020-03-31 revision a0c7c23c9c) [x86_64-linux]

CentOS8でサーバー構築 - 8.ファイアーウォール(Firewalld)

以前は iptablesで管理していましたが、CentOS7以降デフォルトで
Firewalldが使われることになったので、こちらを使う。
zoneは publicのみ設定します。

Firewalldの起動

現在起動していているか確認
# systemctl status firewalld
● firewalld.service - firewalld - dynamic firewall daemon
   Loaded: loaded (/usr/lib/systemd/system/firewalld.service; disabled; vendor preset: enabled)
   Active: inactive (dead)
     Docs: man:firewalld(1)
既にインストールされていているが起動していない。
firewall-cmdでも確認できる
# firewall-cmd --state
not running
パッケージが最新か確認
# dnf list firewalld
CentOS-8 - AppStream                                      448 kB/s | 4.3 kB     00:00
CentOS-8 - Base                                            87 kB/s | 3.9 kB     00:00
CentOS-8 - Extras                                         169 kB/s | 1.5 kB     00:00
CentOS-8 - PowerTools                                      21 kB/s | 4.3 kB     00:00
Extra Packages for Enterprise Linux Modular 8 - x86_64     15 kB/s | 8.1 kB     00:00
Extra Packages for Enterprise Linux 8 - x86_64             10 kB/s | 7.9 kB     00:00
Remi's Modular repository for Enterprise Linux 8 - x86_64 3.5 kB/s | 3.5 kB     00:00
Safe Remi's RPM repository for Enterprise Linux 8 - x86_6 3.1 kB/s | 3.0 kB     00:00
Installed Packages
firewalld.noarch                          0.7.0-5.el8_1.1                          @BaseOS
Available Packages
firewalld.noarch                          0.8.0-4.el8                              BaseOS
0.8が使えるようなのでupdate。dnfではupdateも使えるがupgradeが正しいオプション。
アップグレード
# dnf -y upgrade firewalld
起動
# systemctl start firewalld
起動したとたん、SSHの接続が切られました。事によってはデータセンターに行くパターンです。
設定サービスの確認
# firewall-cmd --zone=public --list-services
cockpit dhcpv6-client ssh
IPv6は使う予定が無いので dhcpv6-clientの通信を停止しておきます。
dhcpv6-client停止
# firewall-cmd --permanent --remove-service=dhcpv6-client
success
# firewall-cmd --reload
見慣れないcockpitはCentOS8の操作をWEB上からできるとか。
セキュリティ面を考慮しないとすぐには利用したくないので、こちらも一旦停止しておきます。
cockpit停止
# firewall-cmd --permanent --remove-service=cockpit
success
# firewall-cmd --reload
success
http https追加
# firewall-cmd --permanent --add-service=http
success
# firewall-cmd --permanent --add-service=https
success
# firewall-cmd --reload
success
確認
# firewall-cmd --zone=public --list-services
http https ssh
cockpitはデフォルトでインストールされていました。
# dnf list installed |grep cockpit
cockpit.x86_64                              196.3-1.el8                                @BaseOS
cockpit-bridge.x86_64                       196.3-1.el8                                @BaseOS
cockpit-packagekit.noarch                   197.3-1.el8                                @AppStream
cockpit-system.noarch                       196.3-1.el8                                @BaseOS
cockpit-ws.x86_64                           196.3-1.el8                                @BaseOS

メール関連のサービス追加

必要に応じて、smtp, smtps, pop3, pop3s, imap, imapsを追加。
# firewall-cmd --permanent --add-service=smtp
success
# firewall-cmd --permanent --add-service=smtps
success
# firewall-cmd --permanent --add-service=pop3
success
# firewall-cmd --permanent --add-service=pop3s
success
# firewall-cmd --reload
success

SSHのポートを変更対応

SSHのPortを12345に変更。
ssh.xmlコピー
# cp /usr/lib/firewalld/services/ssh.xml /etc/firewalld/services/ssh.xml
ssh.xm編集
# vi /etc/firewalld/services/ssh.xml
<?xml version="1.0" encoding="utf-8"?>
<service>
  <short>SSH</short>
  <description>Secure Shell (SSH) is a protocol for logging into and executing commands on remote machines. It provides secure encrypted communications. If you plan on accessing your machine remotely via SSH over a firewalled interface, enable this option. You need the openssh-server package installed for this option to be useful.</description>
  <port protocol="tcp" port="12345"/>
</service>
設定反映
# firewall-cmd --reload
success

FTPのポートを変更対応

FTPのPortを12345に変更。
PASV_PORT: 60100-60100
ftp.xmlコピー
# cp /usr/lib/firewalld/services/ftp.xml /etc/firewalld/services/ftp.xml
ftp.xml編集
# vi /etc/firewalld/services/ftp.xml
?xml version="1.0" encoding="utf-8"?>
<service>
  <short>FTP</short>
  <description>FTP is a protocol used for remote file transfer. If you plan to make your FTP server publicly available, enable this option. You need the vsftpd package installed for this option to be useful.</description>
  <port protocol="tcp" port="12345"/>
  <helper name="ftp"/>
</service>
追加されていない場合はftp追加
# firewall-cmd --permanent --add-service=ftp
success
PASVポート追加
# firewall-cmd --zone=public --permanent --add-port=60000-60100/tcp
success
設定反映
# firewall-cmd --reload
success
確認
# firewall-cmd --list-ports
60000-60100/tcp

コマンドまとめ

起動の確認
firewall-cmd --state
設定の確認
firewall-cmd --list-all
firewall-cmd --get-active-zone
firewall-cmd --zone=public --list-services
firewall-cmd --list-ports
サービスの追加
 firewall-cmd --permanent --add-service=ftp
サービスの削除
firewall-cmd --permanent --remove-service=ftp
設定反映
firewall-cmd --reload
特定のIPを拒否
firewall-cmd --zone=drop --permanent --add-source=46.38.148.0/22
lsofコマンドで現在使っているポートを確認
# lsof -i -nP
・
・
httpd      4176          apache    3u  IPv4  24324      0t0  TCP *:80 (LISTEN)
dovecot    8231            root   23u  IPv4 463784      0t0  TCP *:110 (LISTEN)
dovecot    8231            root   24u  IPv6 463785      0t0  TCP *:110 (LISTEN)
dovecot    8231            root   25u  IPv4 463786      0t0  TCP *:995 (LISTEN)
dovecot    8231            root   26u  IPv6 463787      0t0  TCP *:995 (LISTEN)
dovecot    8231            root   41u  IPv4 463832      0t0  TCP *:143 (LISTEN)
dovecot    8231            root   42u  IPv6 463833      0t0  TCP *:143 (LISTEN)
dovecot    8231            root   43u  IPv4 463834      0t0  TCP *:993 (LISTEN)
dovecot    8231            root   44u  IPv6 463835      0t0  TCP *:993 (LISTEN)
master     8346            root   16u  IPv4 467529      0t0  TCP *:25 (LISTEN)
master     8346            root   20u  IPv4 467532      0t0  TCP *:465 (LISTEN)
・
・

CentOS8でサーバー構築 - 7.Postfix3.3+Dovecot2.3の暗号化設定(SSL/TLS)

以前、CentOS8でサーバー構築 - 2.Postfix+Dovecot(MTA)で、Gmail経由でメールを送受信できるところまで設定しました。
今回は、暗号化してSMTPS Port465、POP3S Port995でメールの送受信をできるようにします。
Portはルーター、firewalld、パケットフィルタリング、などは開けておくこと。
使用するホスト名:mail.kowloonet.net

Let's Encryptで証明書取得

無料でアラートが出ないSSLを使えるようになったなんて、便利になったもんです。。
ここでは Let's Encrypt でTLS暗号化します。
certbotをdnfでインストールできるか確認
# dnf info certbot
Last metadata expiration check: 0:03:12 ago on Sun 14 Jun 2020 10:52:38 AM JST.
Available Packages
Name         : certbot
Version      : 1.4.0
Release      : 1.el8
Architecture : noarch
Size         : 46 k
Source       : certbot-1.4.0-1.el8.src.rpm
Repository   : epel
Summary      : A free, automated certificate authority client
URL          : https://pypi.python.org/pypi/certbot
License      : ASL 2.0
Description  : certbot is a free, automated certificate authority that aims
             : to lower the barriers to entry for encrypting all HTTP traffic on the
             : internet.
epelリポジトリをインストールしていない場合はインストールする。
epelリポジトリ追加・インストール
# dnf -y install epel-release
certbotインストール
# dnf install cerbot
certbot用に使用するホスト名 mail.kowloonet.netで外部から接続できるようにする。
certbot実行時に使用するホスト名がhttpやhttpsで正しく接続できるかを確認しに行きます。
使用するホスト名はDNSレコードに追加しておくこと。
Webサーバーを公開していない場合のやり方は割愛します。
Apacheバーチャルホスト設定
# vi /etc/httpd/conf.d/virtualhost-kowloonet.net.conf
<VirtualHost *:80>
  ServerName kowloonet.net
  ServerAlias mail.kowloonet.net
  DocumentRoot /var/www/html
</VirtualHost>
Apache再起動
# systemctl restart httpd
certbotで証明書作成
# certbot certonly --webroot -w /var/www/html/ -m メールアドレス -d mail.kowloonet.net --agree-tos

Saving debug log to /var/log/letsencrypt/letsencrypt.log
Plugins selected: Authenticator webroot, Installer None

- - - - - - - - - - - - - - - - - - - - - - - - - - - - - - - - - - - - - - - -
Would you be willing to share your email address with the Electronic Frontier
Foundation, a founding partner of the Let's Encrypt project and the non-profit
organization that develops Certbot? We'd like to send you email about our work
encrypting the web, EFF news, campaigns, and ways to support digital freedom.
- - - - - - - - - - - - - - - - - - - - - - - - - - - - - - - - - - - - - - - -
(Y)es/(N)o: N ←初回だけ聞かれる

Saving debug log to /var/log/letsencrypt/letsencrypt.log
Plugins selected: Authenticator webroot, Installer None
Obtaining a new certificate
Performing the following challenges:
http-01 challenge for mail.kowloonet.net
Using the webroot path /var/www/html for all unmatched domains.
Waiting for verification...
Cleaning up challenges

IMPORTANT NOTES:
 - Congratulations! Your certificate and chain have been saved at:
   /etc/letsencrypt/live/mail.kowloonet.net/fullchain.pem
   Your key file has been saved at:
   /etc/letsencrypt/live/mail.kowloonet.net/privkey.pem
   Your cert will expire on 2020-09-12. To obtain a new or tweaked
   version of this certificate in the future, simply run certbot
   again. To non-interactively renew *all* of your certificates, run
   "certbot renew"
 - If you like Certbot, please consider supporting our work by:

   Donating to ISRG / Let's Encrypt:   https://letsencrypt.org/donate
   Donating to EFF:                    https://eff.org/donate-le

Postfixの設定

Postfixのバージョンは 3.3.1でした。
Postfixのバージョン確認
# postconf | grep mail_version
mail_version = 3.3.1
milter_macro_v = $mail_name $mail_version
main.cf設定
# vi /etc/postfix/main.cf
# the server certificate first, then the issuing CA(s) (bottom-up order).
#
#smtpd_tls_cert_file = /etc/pki/tls/certs/postfix.pem
smtpd_tls_cert_file = /etc/letsencrypt/live/mail.kowloonet.net/fullchain.pem
・
・
#smtpd_tls_key_file = /etc/pki/tls/private/postfix.key
smtpd_tls_key_file = /etc/letsencrypt/live/mail.kowloonet.net/privkey.pem

# Announce STARTTLS support to remote SMTP clients, but do not require that
# clients use TLS encryption (opportunistic TLS inbound).
#
smtpd_tls_security_level = may
・
・
# Use TLS if this is supported by the remote SMTP server, otherwise use
# plaintext (opportunistic TLS outbound).
#
smtp_tls_security_level = may

tls_high_cipherlist = HIGH:!aNULL:!eNULL:!SSLv2:!SSLv3:!kRSA:!kDHd:!EXPORT:!ADH:!DSS:!PSK:!SRP:!RC4:!MD5:!DES:!3DES:!EXP:!SEED:!IDEA:!3DES:!LOW@STRENGTH
smtp_tls_ciphers = high
smtpd_tls_ciphers = high
smtpd_tls_mandatory_ciphers = high

smtpd_tls_mandatory_protocols=!SSLv2,!SSLv3
smtp_tls_mandatory_protocols=!SSLv2,!SSLv3
smtpd_tls_protocols=!SSLv2,!SSLv3
smtp_tls_protocols=!SSLv2,!SSLv3
master.cfの設定
# vi /etc/postfix/master.cf
# ======================================
smtp      inet  n       -       n       -       -       smtpd
#smtp      inet  n       -       n       -       1       postscreen
#smtpd     pass  -       -       n       -       -       smtpd
#dnsblog   unix  -       -       n       -       0       dnsblog
#tlsproxy  unix  -       -       n       -       0       tlsproxy
#submission inet n       -       n       -       -       smtpd
#  -o syslog_name=postfix/submission
#  -o smtpd_tls_security_level=encrypt
#  -o smtpd_sasl_auth_enable=yes
#  -o smtpd_tls_auth_only=yes
#  -o smtpd_reject_unlisted_recipient=no
#  -o smtpd_client_restrictions=$mua_client_restrictions
#  -o smtpd_helo_restrictions=$mua_helo_restrictions
#  -o smtpd_sender_restrictions=$mua_sender_restrictions
#  -o smtpd_recipient_restrictions=
#  -o smtpd_relay_restrictions=permit_sasl_authenticated,reject
#  -o milter_macro_daemon_name=ORIGINATING
smtps     inet  n       -       n       -       -       smtpd
#  -o syslog_name=postfix/smtps
  -o smtpd_tls_wrappermode=yes
  -o smtpd_sasl_auth_enable=yes
#  -o smtpd_reject_unlisted_recipient=no
#  -o smtpd_client_restrictions=$mua_client_restrictions
#  -o smtpd_helo_restrictions=$mua_helo_restrictions
#  -o smtpd_sender_restrictions=$mua_sender_restrictions
#  -o smtpd_recipient_restrictions=
#  -o smtpd_relay_restrictions=permit_sasl_authenticated,reject
#  -o milter_macro_daemon_name=ORIGINATING
#628       inet  n       -       n       -       -       qmqpd
pickup    unix  n       -       n       60      1       pickup
cleanup   unix  n       -       n       -       0       cleanup
qmgr      unix  n       -       n       300     1       qmgr
#qmgr     unix  n       -       n       300     1       oqmgr
tlsmgr    unix  -       -       n       1000?   1       tlsmgr
Postfix再起動
# systemctl restart postfix

Dovecotの設定

アップグレードしてdovecotのバージョンが2.2から2.3に変わり、設定ファイルが結構変わり以前だったら出なかったWarningが結構出るようになり、 色々mergeするのも面倒だったので、dovecotを一旦removeして再インストールしました。
Dovecotのバージョン2.3.8で対応します。
デフォルトで ssl = required になっていましたq。
アップデートに伴いWarning出た件は下記参照。
dovecote再インストール
# dnf remove dovecot
# dnf -y install dovecot
remove後も設定ファイルは 10-ssl.conf.rpmsave などで残ります。
dovecotのバージョン確認
# dovecot --version
2.3.8 (9df20d2db)
10-mail.conf設定
# vi /etc/dovecot/conf.d/10-mail.conf
# <doc/wiki/MailLocation.txt>
#
mail_location = maildir:~/Maildir
10-auth.conf設定
# vi /etc/dovecot/conf.d/10-auth.conf
# See also ssl=required setting.
disable_plaintext_auth = no
10-ssl.confの設定
# vi /etc/dovecot/conf.d/10-ssl.conf
# SSL/TLS support: yes, no, required. 
# disable plain pop3 and imap, allowed are only pop3+TLS, pop3s, imap+TLS and imaps
# plain imap and pop3 are still allowed for local connections
ssl = required

# PEM encoded X.509 SSL/TLS certificate and private key. They're opened before
# dropping root privileges, so keep the key file unreadable by anyone but
# root. Included doc/mkcert.sh can be used to easily generate self-signed
# certificate, just make sure to update the domains in dovecot-openssl.cnf
#ssl_cert = </etc/pki/dovecot/certs/dovecot.pem
#ssl_key = </etc/pki/dovecot/private/dovecot.pem
ssl_cert = </etc/letsencrypt/live/mail.kowloonet.net/fullchain.pem
ssl_key = </etc/letsencrypt/live/mail.kowloonet.net/privkey.pem
・
・
# SSL DH parameters
# Generate new params with `openssl dhparam -out /etc/dovecot/dh.pem 4096`
# Or migrate from old ssl-parameters.dat file with the command dovecot
# gives on startup when ssl_dh is unset.
ssl_dh = </etc/dovecot/dh.pem

# Minimum SSL protocol version to use. Potentially recognized values are SSLv3,
# TLSv1, TLSv1.1, and TLSv1.2, depending on the OpenSSL version used.
ssl_min_protocol = TLSv1.2

# SSL ciphers to use, the default is:
#ssl_cipher_list = ALL:!kRSA:!SRP:!kDHd:!DSS:!aNULL:!eNULL:!EXPORT:!DES:!3DES:!MD5:!PSK:!RC4:!ADH:!LOW@STRENGTH
# To disable non-EC DH, use:
#ssl_cipher_list = ALL:!DH:!kRSA:!SRP:!kDHd:!DSS:!aNULL:!eNULL:!EXPORT:!DES:!3DES:!MD5:!PSK:!RC4:!ADH:!LOW@STRENGTH
#ssl_cipher_list = PROFILE=SYSTEM
ssl_cipher_list = HIGH:!aNULL:!eNULL:!SSLv2:!SSLv3:!kRSA:!kDHd:!EXPORT:!ADH:!DSS:!PSK:!SRP:!RC4:!MD5:!DES:!3DES:!EXP:!SEED:!IDEA:!3DES:!LOW@STRENGTH
・
・
# Prefer the server's order of ciphers over client's.
ssl_prefer_server_ciphers = yes
ssl_prefer_server_ciphers:
このディレクティブを yes に設定すると、接続先のクライアントが指定された暗号化の命令に従います。
dh.pemの作製
 OpenSSL 1.1.1c FIPS です。
# openssl dhparam 4096 -out /etc/dovecot/dh.pem
 結構時間かかります。
v2.2の古いパラメータを使いたい場合は
dd if=/var/lib/dovecot/ssl-parameters.dat bs=1 skip=88 | openssl dhparam -inform der > dh.pem
と書いてあったので、特に必要ない場合は
openssl dhparam 4096 > dh.pem
の方が良さげです。
dovecot起動設定
# systemctl start dovecot
# systemctl enable dovecot
Created symlink /etc/systemd/system/multi-user.target.wants/dovecot.service → /usr/lib/systemd/system/dovecot.service.
指定するcipherを個別に TLS_AES_256_GCM_SHA384:ECDHE-ECDSA-AES256-GCM-SHA384:ECDHE-ECDSA-AES128-GCM-SHA256 など指定しても良いです。
こちらを参考にしました
4.13. TLS 設定の強化 Red Hat Enterprise Linux 7 | Red Hat Customer Portal
推奨事項を満たす暗号化スイートを一覧表示
# openssl ciphers -v 'kEECDH+aECDSA+AES:kEECDH+AES+aRSA:kEDH+aRSA+AES' | column -t
TLS_AES_256_GCM_SHA384         TLSv1.3  Kx=any   Au=any    Enc=AESGCM(256)             Mac=AEAD
TLS_CHACHA20_POLY1305_SHA256   TLSv1.3  Kx=any   Au=any    Enc=CHACHA20/POLY1305(256)  Mac=AEAD
TLS_AES_128_GCM_SHA256         TLSv1.3  Kx=any   Au=any    Enc=AESGCM(128)             Mac=AEAD
TLS_AES_128_CCM_SHA256         TLSv1.3  Kx=any   Au=any    Enc=AESCCM(128)             Mac=AEAD
ECDHE-ECDSA-AES256-GCM-SHA384  TLSv1.2  Kx=ECDH  Au=ECDSA  Enc=AESGCM(256)             Mac=AEAD
ECDHE-ECDSA-AES256-CCM8        TLSv1.2  Kx=ECDH  Au=ECDSA  Enc=AESCCM8(256)            Mac=AEAD
ECDHE-ECDSA-AES256-CCM         TLSv1.2  Kx=ECDH  Au=ECDSA  Enc=AESCCM(256)             Mac=AEAD
ECDHE-ECDSA-AES128-GCM-SHA256  TLSv1.2  Kx=ECDH  Au=ECDSA  Enc=AESGCM(128)             Mac=AEAD
ECDHE-ECDSA-AES128-CCM8        TLSv1.2  Kx=ECDH  Au=ECDSA  Enc=AESCCM8(128)            Mac=AEAD
ECDHE-ECDSA-AES128-CCM         TLSv1.2  Kx=ECDH  Au=ECDSA  Enc=AESCCM(128)             Mac=AEAD
ECDHE-ECDSA-AES256-SHA384      TLSv1.2  Kx=ECDH  Au=ECDSA  Enc=AES(256)                Mac=SHA384
ECDHE-ECDSA-AES128-SHA256      TLSv1.2  Kx=ECDH  Au=ECDSA  Enc=AES(128)                Mac=SHA256
ECDHE-ECDSA-AES256-SHA         TLSv1    Kx=ECDH  Au=ECDSA  Enc=AES(256)                Mac=SHA1
ECDHE-ECDSA-AES128-SHA         TLSv1    Kx=ECDH  Au=ECDSA  Enc=AES(128)                Mac=SHA1
ECDHE-RSA-AES256-GCM-SHA384    TLSv1.2  Kx=ECDH  Au=RSA    Enc=AESGCM(256)             Mac=AEAD
ECDHE-RSA-AES128-GCM-SHA256    TLSv1.2  Kx=ECDH  Au=RSA    Enc=AESGCM(128)             Mac=AEAD
ECDHE-RSA-AES256-SHA384        TLSv1.2  Kx=ECDH  Au=RSA    Enc=AES(256)                Mac=SHA384
ECDHE-RSA-AES128-SHA256        TLSv1.2  Kx=ECDH  Au=RSA    Enc=AES(128)                Mac=SHA256
ECDHE-RSA-AES256-SHA           TLSv1    Kx=ECDH  Au=RSA    Enc=AES(256)                Mac=SHA1
ECDHE-RSA-AES128-SHA           TLSv1    Kx=ECDH  Au=RSA    Enc=AES(128)                Mac=SHA1
DHE-RSA-AES256-GCM-SHA384      TLSv1.2  Kx=DH    Au=RSA    Enc=AESGCM(256)             Mac=AEAD
DHE-RSA-AES256-CCM8            TLSv1.2  Kx=DH    Au=RSA    Enc=AESCCM8(256)            Mac=AEAD
DHE-RSA-AES256-CCM             TLSv1.2  Kx=DH    Au=RSA    Enc=AESCCM(256)             Mac=AEAD
DHE-RSA-AES128-GCM-SHA256      TLSv1.2  Kx=DH    Au=RSA    Enc=AESGCM(128)             Mac=AEAD
DHE-RSA-AES128-CCM8            TLSv1.2  Kx=DH    Au=RSA    Enc=AESCCM8(128)            Mac=AEAD
DHE-RSA-AES128-CCM             TLSv1.2  Kx=DH    Au=RSA    Enc=AESCCM(128)             Mac=AEAD
DHE-RSA-AES256-SHA256          TLSv1.2  Kx=DH    Au=RSA    Enc=AES(256)                Mac=SHA256
DHE-RSA-AES128-SHA256          TLSv1.2  Kx=DH    Au=RSA    Enc=AES(128)                Mac=SHA256
DHE-RSA-AES256-SHA             SSLv3    Kx=DH    Au=RSA    Enc=AES(256)                Mac=SHA1
DHE-RSA-AES128-SHA             SSLv3    Kx=DH    Au=RSA    Enc=AES(128)                Mac=SHA1
v2.2の設定ファイル 10-ssl.conf を修正していたら下記エラーが起こりました。
v2.3にアップデート後に設定ファイルを適切に対応するには
/usr/share/doc/dovecot/example-config/conf.d/10-ssl.conf
を参考にすると良いです。
Jun 22 08:31:30 kowloonet dovecot[6465]: config: Warning: Obsolete setting in /etc/dovecot/conf.d/10-ssl.conf:51: ssl_dh_parameters_length is no longer needed
Jun 22 08:31:30 kowloonet dovecot[6465]: config: Warning: Obsolete setting in /etc/dovecot/conf.d/10-ssl.conf:54: ssl_protocols has been replaced by ssl_min_protocol
Jun 22 08:37:56 kowloonet dovecot[6569]: config: Warning: please set ssl_dh=</etc/dovecot/dh.pem
ssl_dh を指定しない時のエラー。
un 22 08:21:10 kowloonet dovecot[6388]: pop3-login: Error: Failed to initialize SSL server context: Can't load DH parameters: error:1408518A:SSL routines:ssl3_ctx_ctrl:dh key too small: user=<>, rip=xxx.xxx.xxx.xxx, lip=xxx.xxx.xxx.xxx, session=<VbetYaCoIfF+hMEL>

Gmail宛にメールが送信されない件

maillog
Apr  1 07:51:34 kowloonet postfix/smtpd[2696]: disconnect from softbank126200169177.bbtec.                  net[126.200.169.177] ehlo=1 auth=1 mail=1 rcpt=1 data=1 rset=1 quit=1 commands=7
Apr  1 07:51:35 kowloonet postfix/smtp[2699]: 6E1F9C172C: to=, r                  elay=gmail-smtp-in.l.google.com[64.233.189.27]:25, delay=1.5, delays=0.09/0.03/0.85/0.53,                   dsn=5.7.1, status=bounced (host gmail-smtp-in.l.google.com[64.233.189.27] said: 550-5.7.1                   [160.16.139.144      12] Our system has detected that this message is 550-5.7.1 likely uns                  olicited mail. To reduce the amount of spam sent to Gmail, 550-5.7.1 this message has been                   blocked. Please visit 550-5.7.1  https://support.google.com/mail/?p=UnsolicitedMessageErr                  or 550 5.7.1  for more information. 6-20020a630e46000000b003824f9f2affsi710091pgo.451 - gs                  mtp (in reply to end of DATA command))
DNSレコードに下記を追加することで解決。
エントリ名タイプデータTTL
@TXTv=spf1 a:mail.kowloonet.net include:_spf.google.com ~all 3600s
参照: https://support.google.com/a/answer/10684623?hl=ja&ref_topic=10685331

【Linux】vi操作メモ

vimの設定

vim設定
# vi ~/.vimrc
set tabstop=2
set shiftwidth=2
set smartindent
set expandtab
# source ~/.vimrc
tabstopタブ幅をスペースn分で読み込み
shiftwidthタブ幅をスペースn分で作成
smartindent自動インデント
expandtabタブを半角スペースで挿入

vim拡張子の関連付け

vim設定
# echo 'autocmd BufNewFile,BufRead *.vue set filetype=php' >> ~/.vimrc
# vi test.vue
# source ~/.vimrc

カーソルの移動

上下左右h j k l
単語の先頭w
前の単語の先頭b
単語の末尾e
前の単語の末尾ge
段落の移動{ }
行の先頭^
行の末尾$
ファイルの先頭gg
ファイルの末尾G
画面スクロール下Ctrl+F
画面スクロールCtrl+B
全選択ggVG
確認しながら全置換 :%s/置換対象文字列/置換文字列/gc

CentOS8でサーバー構築 - 5.バーチャルホスト・BASIC認証の設定(Apache2.4)

バーチャルホスト
 dev.kowloonet.local
ドキュメントルートは
 /home/dev
で設定する。
DNSは内部向けにBINDで dev.kowloonet.local でアクセスできるようにしてあります。
独自ドメインを取得していて外部のDNSサーバーを利用している場合は
コントロールパネルなどから設定が必要です。
CentOS8でサーバー構築 - 4.内部向けDNSサーバー(BIND)

バーチャルホストの設定

未定義バーチャルホストの接続を拒否
# vi /etc/httpd/conf.d/virtualhost-00.conf
<VirtualHost _default_:80>
    ServerName any
    <Location />
        Require all denied
    </Location>
</VirtualHost>
バーチャルホスト設定
# vi /etc/httpd/conf.d/virtualhost-dev.conf
<VirtualHost *:80>
    ServerName dev.kowloonet.local
    DocumentRoot /home/dev
    <Directory /home/dev>
      Options FollowSymLinks
      DirectoryIndex index.html index.php
      AllowOverride All
      Require all granted
    </Directory>
</VirtualHost>
Apache再起動
# systemctl restart httpd

BASIC認証の設定

先程追加したバーチャルホストに対してBASIC認証をかける。
バーチャルホスト追加
# vi /etc/httpd/conf.d/virtualhost-dev.conf
<VirtualHost *:80>
    ServerName dev.kowloonet.local
    DocumentRoot /home/dev
    # Auth Basic
    <Directory /home/dev>
      Options FollowSymLinks
      DirectoryIndex index.html index.php
      AllowOverride All
      AuthType Basic
      AuthName "Basic Authentication"
      AuthUserFile /etc/httpd/conf/.htpasswd_dev
      require valid-user
    </Directory>
</VirtualHost>
htpasswdファイル作成(新規で作成)
# htpasswd -c /etc/httpd/conf/.htpasswd_dev ユーザ名
New password:
Re-type new password:
Adding password for user ユーザ名
htpasswdファイル作成(ユーザを追加)
# htpasswd /etc/httpd/conf/.htpasswd_dev ユーザ名
Apache再起動
# systemctl restart httpd
ログファイルを別にしたい場合
<VirtualHost *:80>
    ServerName dev.kowloonet.local
    DocumentRoot /home/dev
    ErrorLog logs/dev.kowloonet.local-error_log
    CustomLog logs/dev.kowloonet.local-access_log combined env=!no_log
    <Directory /home/dev>
      Options FollowSymLinks
      DirectoryIndex index.html index.php
      AllowOverride All
      Require all granted
    </Directory>
</VirtualHost>

TeraTermのマクロ - 自動でROOTログイン

パスワード形式での認証

username = 'ユーザー名'
hostname = '192.168.128.100'
pass = 'ユーザのパスワード'
rootpass = 'ルートのパスワード'
port = '22'

;;;;;;;;;;;;;;;;;;;;;;;;;;;;;;;;;;;;;;;;;

msg = hostname
strconcat msg ':port /ssh /2 /auth=password /user='
strconcat msg username
strconcat msg ' /passwd='
strconcat msg pass

connect msg

wait username
varCmd = 'su -'
sendln varCmd
wait 'Password:'
sendln ROOTPASS

CentOS8でサーバー構築 - 4.内部向けDNSサーバー(BIND)

ローカルネットワーク内に立てたサーバーは、そのままではIPアドレス
http://192.168.1.100
などででしかアクセスできない。
これだと開発するのにしても何かと不都合なので、
内部向けにドメイン名でもアクセスできるようにしておく。
Gateway192.168.128.1
サーバーIPアドレス192.168.128.100
サーバードメインkowloonet.local
メールドメインmail.kowloonet.local
追加ドメインwww.kowloonet.local
追加ドメインdev.kowloonet.local
昔Pentium3のGatewayのPC使ってたわ。。

BINDのインストール

インストール
# yum -y install bind bind-utils
設定
# vi /etc/named.conf
//
// named.conf
//
// Provided by Red Hat bind package to configure the ISC BIND named(8) DNS
// server as a caching only nameserver (as a localhost DNS resolver only).
//
// See /usr/share/doc/bind*/sample/ for example named configuration files.
//
options {
        listen-on port 53 { 127.0.0.1; 192.168.128.0/24;};
        listen-on-v6 port 53 { ::1; };
        directory       "/var/named";
        dump-file       "/var/named/data/cache_dump.db";
        statistics-file "/var/named/data/named_stats.txt";
        memstatistics-file "/var/named/data/named_mem_stats.txt";
        secroots-file   "/var/named/data/named.secroots";
        recursing-file  "/var/named/data/named.recursing";
        allow-query     { localhost; 192.168.128.0/24;};

        /*
         - If you are building an AUTHORITATIVE DNS server, do NOT enable recursion.
         - If you are building a RECURSIVE (caching) DNS server, you need to enable
           recursion.
         - If your recursive DNS server has a public IP address, you MUST enable access
           control to limit queries to your legitimate users. Failing to do so will
           cause your server to become part of large scale DNS amplification
           attacks. Implementing BCP38 within your network would greatly
           reduce such attack surface
        */
        recursion no;

        dnssec-enable yes;
        dnssec-validation yes;

        managed-keys-directory "/var/named/dynamic";

        pid-file "/run/named/named.pid";
        session-keyfile "/run/named/session.key";

        /* https://fedoraproject.org/wiki/Changes/CryptoPolicy */
        include "/etc/crypto-policies/back-ends/bind.config";
};

logging {
        channel default_debug {
                file "data/named.run";
                severity dynamic;
        };
};

/*
zone "." IN {
        type hint;
        file "named.ca";
};
*/

zone "kowloonet.local" IN {
       type master;
       file "kowloonet.local.zone";
};

include "/etc/named.rfc1912.zones";
include "/etc/named.root.key";
ゾーンファイル作成
# vi /var/named/kowloonet.local.zone
$TTL    86400

@       IN      SOA     kowloonet.local. root.kowloonet.local.    (
        2016050204
        3600
        900
        604800
        86400
)

               IN      NS     kowloonet.local.
               IN      MX     10 mail
               IN      A      192.168.128.100
www      IN      A      192.168.128.100
mail     IN      A      192.168.128.100
dev      CNAME      www
named.conf確認
# named-checkconf
ゾーンファイル確認
# named-checkzone kowloonet.local /var/named/kowloonet.local.zone
zone kowloonet.local/IN: loaded serial 2016050204
OK
起動
# systemctl start named
# systemctl enable named
Created symlink /etc/systemd/system/multi-user.target.wants/named.service → /usr/lib/systemd/system/named.service.

DNSの設定

resolv.confを修正し、先程設定したDNSサーバーを設定。
NetworkManagerがresolv.confを自動で生成・上書きするのを止めておきます。
DNSサーバのIPアドレス設定
# vi /etc/resolv.conf
# Generated by NetworkManager
search local
nameserver 192.168.128.100
nameserver 192.168.128.1
※nameserver は必ず内部向けDNSサーバーのアドレスを先に書く事
逆だと機能しませんでした。
NetworkManageの設定
# vi /etc/NetworkManager/NetworkManager.conf
・
・
[main]
#plugins=ifcfg-rh,ibft
dns=none
NetworkManageの再起動
# systemctl restart NetworkManager

ドメインが認識されるかの確認(サーバーから)

サーバー(192.168.128.100)でドメインが認識できるか確認。
確認
# ping -c 4 www.kowloonet.local
PING www.kowloonet.local (192.168.128.100) 56(84) bytes of data.
64 bytes from kowloonet.local (192.168.128.100): icmp_seq=1 ttl=64 time=0.069 ms
64 bytes from kowloonet.local (192.168.128.100): icmp_seq=2 ttl=64 time=0.053 ms
64 bytes from kowloonet.local (192.168.128.100): icmp_seq=3 ttl=64 time=0.052 ms
64 bytes from kowloonet.local (192.168.128.100): icmp_seq=4 ttl=64 time=0.055 ms

--- www.kowloonet.local ping statistics ---
4 packets transmitted, 4 received, 0% packet loss, time 82ms
rtt min/avg/max/mdev = 0.052/0.057/0.069/0.008 ms

# ping -c 4 dev.kowloonet.local
PING www.kowloonet.local (192.168.128.100) 56(84) bytes of data.
64 bytes from kowloonet.local (192.168.128.100): icmp_seq=1 ttl=64 time=0.023 ms
64 bytes from kowloonet.local (192.168.128.100): icmp_seq=2 ttl=64 time=0.052 ms
64 bytes from kowloonet.local (192.168.128.100): icmp_seq=3 ttl=64 time=0.049 ms
64 bytes from kowloonet.local (192.168.128.100): icmp_seq=4 ttl=64 time=0.049 ms

--- www.kowloonet.local ping statistics ---
4 packets transmitted, 4 received, 0% packet loss, time 32ms
rtt min/avg/max/mdev = 0.023/0.043/0.052/0.012 ms

ドメインが認識されるかの確認(クライアントから)

同じネットワーク内にあるクライアントPC(192.168.128.101等)から
ドメインが認識できるか確認する。
WindowsのDNSサーバー変更
コントロールパネルなどから現在使用している接続のプロパティを表示させてDNSサーバーを追加。
(コントロール パネル→ネットワークとインターネット→ネットワークと共有センター 接続:)
ネットワークのプロパティで「インターネットプロトコルバージョン4(TCP/IPv4)のプロパティ」で、
DNSサーバーに 192.168.128.100 を追加する。
※優先DNSサーバーに内部向けDNSサーバーのアドレスを先に書く事
コマンドプロンプトで確認
>ping www.kowloonet.local

www.kowloonet.local [192.168.128.100]に ping を送信しています 32 バイトのデータ:
192.168.128.100 からの応答: バイト数 =32 時間 <1ms TTL=64

192.168.128.100 の ping 統計:
    パケット数: 送信 = 4、受信 = 4、損失 = 0 (0% の損失)、
ラウンド トリップの概算時間 (ミリ秒):
    最小 = 0ms、最大 = 0ms、平均 = 0ms

>ping dev.kowloonet.local

www.kowloonet.local [192.168.128.100]に ping を送信しています 32 バイトのデータ:
192.168.128.100 からの応答: バイト数 =32 時間 <1ms TTL=64

192.168.128.100 の ping 統計:
    パケット数: 送信 = 4、受信 = 4、損失 = 0 (0% の損失)、
ラウンド トリップの概算時間 (ミリ秒):
    最小 = 0ms、最大 = 0ms、平均 = 0ms

CentOS8でサーバー構築 - 3.LAMP環境構築(Apache2.4+MySQL8.0+PHP7.4のインストール)

Linux(OS)環境において
  • Apache(WEBサーバー)のインストールと設定
  • MySQL(RDBMS)のインストールと設定
  • PHP(プログラミング言語)と使いそうなPHPのモジュールのインストールと設定
LAMP環境を構築していく。

プログラミング言語をこれから習得してプロを目指す初学者の方、
言語には触っているがLinuxなどのサーバー関連はイマイチの方、
XAMPP環境と比べて一手間かかってしまうが、LAMP環境で学習することを強くお勧めします。


OS:Operating System
RDBMS:relational database management system
PHP:Hypertext Preprocessor

Apacheのインストール

dnfでインストールできるApacheのバージョンは2.4.37でした。
ドメイン kowloonet.local
IPアドレス192.168.1.100
で設定。
インストール
# dnf -y install httpd
設定
# vi /etc/httpd/conf/httpd.conf
#
ServerName kowloonet.local:80
・
・
# Further relax access to the default document root:
<Directory "/var/www/html">
    #
    # Possible values for the Options directive are "None", "All",
    # or any combination of:
    #   Indexes Includes FollowSymLinks SymLinksifOwnerMatch ExecCGI MultiViews
    #
    # Note that "MultiViews" must be named *explicitly* --- "Options All"
    # doesn't give it to you.
    #
    # The Options directive is both complicated and important.  Please see
    # http://httpd.apache.org/docs/2.4/mod/core.html#options
    # for more information.
    #
    Options Includes ExecCGI FollowSymLinks

    #
    # AllowOverride controls what directives may be placed in .htaccess files.
    # It can be "All", "None", or any combination of the keywords:
    #   Options FileInfo AuthConfig Limit
    #
    AllowOverride All

    #
    # Controls who can get stuff from this server.
    #
    Require all granted
</Directory>

#
# DirectoryIndex: sets the file that Apache will serve if a directory
# is requested.
#
<IfModule dir_module>
    DirectoryIndex index.html index.php index.cgi
</IfModule>

・
・
    #
    # If you prefer a logfile with access, agent, and referer information
    # (Combined Logfile Format) you can use the following directive.
    #
    SetEnvIf Request_URI "default\.ida" no_log
    SetEnvIf Request_URI "cmd\.exe" no_log
    SetEnvIf Request_URI "root\.exe" no_log
    SetEnvIf Request_URI "Admin\.dll" no_log
    SetEnvIf Request_URI "NULL\.IDA" no_log
    SetEnvIf Request_URI "\.(bmp|css|gif|htc|ico|jpe?g|svg|js|mpe?g|png|swf|woff|ttf)$" no_log
    CustomLog logs/access_log combined env=!no_log
    #CustomLog "logs/access_log" combined
・
・
#AddDefaultCharset UTF-8
Indexes
DirectoryIndexで指定したファイル(index.html)が存在しない場合、ディレクトリ内ファイルを一覧表示。
FollowSymLinks
シンボリックリンクの許可。
Includes
SSIの許可。
ExecCGI
CGIの許可。
AllowOverride All
.htaccessの許可
ドキュメントルートのファイル所有者変更
# chown -R xiohei. /var/www/
起動
# systemctl start httpd
# systemctl enable httpd
Created symlink /etc/systemd/system/multi-user.target.wants/httpd.service → /usr/lib/systemd/system/httpd.service.
確認
ブラウザで 192.168.1.100 へアクセスしてみて確認。
テストページのデザインが一新されていました。
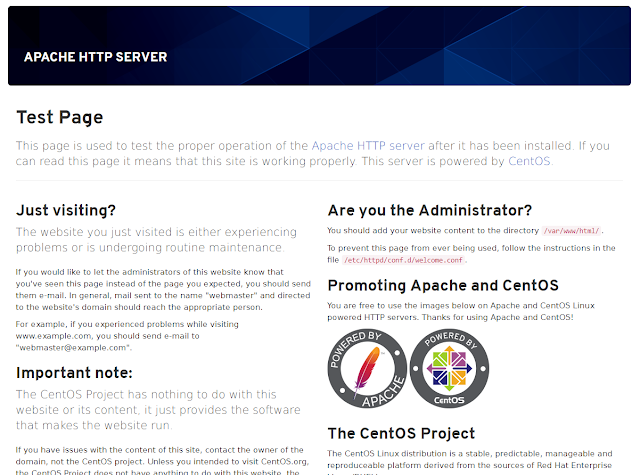
アクセスログ表示
# tail -f /var/log/httpd/access_log
エラーログ表示
# tail -f /var/log/httpd/error_log
テストページを非表示に
外部に公開する場合は非表示にする事。
# cd /etc/httpd/conf.d/
# mv welcome.conf welcome.conf.org
# mv autoindex.conf autoindex.conf.org
# systemctl restart httpd

MySQLのインストール

CentOS8ではMariaDBをアンインストールする必要は無い様です。
バージョン確認
# dnf list mysql*
メタデータの期限切れの最終確認: 0:32:26 時間前の 2020年05月21日 22時41分01秒 に実施しまし た。
利用可能なパッケージ
MySQL-zrm.noarch                3.0-23.el8                                       epel
mysql.x86_64                    8.0.17-3.module_el8.0.0+181+899d6349             AppStream
mysql-common.x86_64             8.0.17-3.module_el8.0.0+181+899d6349             AppStream
mysql-devel.x86_64              8.0.17-3.module_el8.0.0+181+899d6349             AppStream
mysql-errmsg.x86_64             8.0.17-3.module_el8.0.0+181+899d6349             AppStream
mysql-libs.x86_64               8.0.17-3.module_el8.0.0+181+899d6349             AppStream
mysql-server.x86_64             8.0.17-3.module_el8.0.0+181+899d6349             AppStream
mysql-test.x86_64               8.0.17-3.module_el8.0.0+181+899d6349             AppStream
インストール
# dnf install @mysql:8.0
「@」を付けてコロンの後にバージョンを指定する形で、必要なものをインストールしてくれます。
起動
# systemctl start mysqld
# systemctl enable mysqld
Created symlink /etc/systemd/system/multi-user.target.wants/mysqld.service → /usr/lib/systemd/system/mysqld.service.
初期設定
文字コードの設定はデフォルトで utf8なので設定する必要は無い様です。
現在開発用として構築しているので、
使い勝手が良いようにパスワードのセキュリティレベルをLOWに。
# mysql_secure_installation

Securing the MySQL server deployment.

Connecting to MySQL using a blank password.

VALIDATE PASSWORD COMPONENT can be used to test passwords
and improve security. It checks the strength of password
and allows the users to set only those passwords which are
secure enough. Would you like to setup VALIDATE PASSWORD component?

Press y|Y for Yes, any other key for No: y

There are three levels of password validation policy:

LOW    Length >= 8
MEDIUM Length >= 8, numeric, mixed case, and special characters
STRONG Length >= 8, numeric, mixed case, special characters and dictionary                  file

Please enter 0 = LOW, 1 = MEDIUM and 2 = STRONG: 0
Please set the password for root here.

New password:

Re-enter new password:

Estimated strength of the password: 50
Do you wish to continue with the password provided?(Press y|Y for Yes, any other key for No) : y
By default, a MySQL installation has an anonymous user,
allowing anyone to log into MySQL without having to have
a user account created for them. This is intended only for
testing, and to make the installation go a bit smoother.
You should remove them before moving into a production
environment.

Remove anonymous users? (Press y|Y for Yes, any other key for No) : y
Success.


Normally, root should only be allowed to connect from
'localhost'. This ensures that someone cannot guess at
the root password from the network.

Disallow root login remotely? (Press y|Y for Yes, any other key for No) : y
Success.

By default, MySQL comes with a database named 'test' that
anyone can access. This is also intended only for testing,
and should be removed before moving into a production
environment.


Remove test database and access to it? (Press y|Y for Yes, any other key for No) : y
 - Dropping test database...
Success.

 - Removing privileges on test database...
Success.

Reloading the privilege tables will ensure that all changes
made so far will take effect immediately.

Reload privilege tables now? (Press y|Y for Yes, any other key for No) : y
Success.

All done!
パスワードのセキュリティレベルを個別に変更したい場合、
パスワードの条件を4文字以上に緩和
mysql> SET GLOBAL validate_password.length=4;
パスワードの条件緩和
mysql> SET GLOBAL validate_password.policy=LOW;
パスワードの変更
mysql> ALTER USER ユーザ名@localhost IDENTIFIED BY '変更後のパスワード';
データーベースの確認
mysql> show databases;
+--------------------+
| Database           |
+--------------------+
| information_schema |
| mysql              |
| performance_schema |
| sys                |
+--------------------+
4 rows in set (0.08 sec)
ここではユーザ名「xiohei」を、全てのデーターベースにローカルホスト内からパスワード「1q2w」でアクセスできるように作成。
MySQL8からはCREATE USERを使う。
ユーザの追加
mysql> CREATE USER xiohei@localhost IDENTIFIED BY '1q2w'; mysql> GRANT ALL PRIVILEGES ON *.* TO xiohei@localhost WITH GRANT OPTION;
MySQL5.7以前のバージョンでは
GRANT ALL PRIVILEGES ON *.* TO xiohei@localhost IDENTIFIED BY '1q2w';
接続の確認
# mysql -uxiohei -p1q2w mysql: [Warning] Using a password on the command line interface can be insecure. Welcome to the MySQL monitor. Commands end with ; or \g. Your MySQL connection id is 46 Server version: 8.0.16 MySQL Community Server - GPL Copyright (c) 2000, 2019, Oracle and/or its affiliates. All rights reserved. Oracle is a registered trademark of Oracle Corporation and/or its affiliates. Other names may be trademarks of their respective owners. Type 'help;' or '\h' for help. Type '\c' to clear the current input statement. mysql>

PHPのインストール

dnfでAppStreamリポジトリからインストールできるPHPのバージョンは、7.2.11でした。
# dnf list php
# dnf list available | grep php
remiリポジトリからから現時点で最新のPHP7.4をインストールしましょう。
epelリポジトリ追加
# dnf -y install epel-release
remiリポジトリ追加
# rpm -Uvh http://rpms.remirepo.net/enterprise/remi-release-8.rpm
# dnf module reset php
# dnf module enable php:remi-7.4
php-devel をインストールする時にPowerToolsリポジトリから
libedit-devel をインストール必要があるのでこちらも利用可能にしておく。
PowerToolsリポジトリ追加
# dnf config-manager --set-enabled PowerTools
利用可能リポジトリ確認
# dnf repolist --enabled
メタデータの期限切れの最終確認: 0:31:56 時間前の 2020年05月21日 20時48分35秒 に実施しまし た。
repo id             repo の名前                                                      状態
AppStream           CentOS-8 - AppStream                                             5,283
BaseOS              CentOS-8 - Base                                                  1,661
PowerTools          CentOS-8 - PowerTools                                            1,456
*epel               Extra Packages for Enterprise Linux 8 - x86_64                   5,601
*epel-modular       Extra Packages for Enterprise Linux Modular 8 - x86_64               0
extras              CentOS-8 - Extras                                                   16
remi-modular        Remi's Modular repository for Enterprise Linux 8 - x86_64          359
remi-safe           Safe Remi's RPM repository for Enterprise Linux 8 - x86_64       2,285
利用可能パッケージ確認
# dnf info php
利用可能なパッケージ
名前         : php
バージョン   : 7.4.6
リリース     : 1.el8.remi
Arch         : x86_64
サイズ       : 3.0 M
ソース       : php-7.4.6-1.el8.remi.src.rpm
リポジトリー : remi-modular
概要         : PHP scripting language for creating dynamic web sites
URL          : http://www.php.net/
ライセンス   : PHP and Zend and BSD and MIT and ASL 1.0 and NCSA
説明         : PHP is an HTML-embedded scripting language. PHP attempts to
             : make it easy for developers to write dynamically generated web
             : pages. PHP also offers built-in database integration for
             : several commercial and non-commercial database management
             : systems, so writing a database-enabled webpage with PHP is
             : fairly simple. The most common use of PHP coding is probably
             : as a replacement for CGI scripts.
             :
             : The php package contains the module (often referred to as
             : mod_php) which adds support for the PHP language to Apache
             : HTTP Server.
PHPのインストール
# dnf -y install php php-devel php-gd php-zip php-mysqlnd
上記コマンドで必要なものもインストールしてくれるのでいろいろ入ります。
# dnf list installed | grep php
php.x86_64                                         7.4.6-1.el8.remi                                  @remi-modular
php-cli.x86_64                                     7.4.6-1.el8.remi                                  @remi-modular
php-common.x86_64                                  7.4.6-1.el8.remi                                  @remi-modular
php-devel.x86_64                                   7.4.6-1.el8.remi                                  @remi-modular
php-fpm.x86_64                                     7.4.6-1.el8.remi                                  @remi-modular
php-gd.x86_64                                      7.4.6-1.el8.remi                                  @remi-modular
php-json.x86_64                                    7.4.6-1.el8.remi                                  @remi-modular
php-mbstring.x86_64                                7.4.6-1.el8.remi                                  @remi-modular
php-mysqlnd.x86_64                                 7.4.6-1.el8.remi                                  @remi-modular
php-opcache.x86_64                                 7.4.6-1.el8.remi                                  @remi-modular
php-pdo.x86_64                                     7.4.6-1.el8.remi                                  @remi-modular
php-pecl-zip.x86_64                                1.18.2-1.el8.remi.7.4                             @remi-modular
php-sodium.x86_64                                  7.4.6-1.el8.remi                                  @remi-modular
php-xml.x86_64                                     7.4.6-1.el8.remi                                  @remi-modular
libedit-develが無い状態でphp-develをインストールしようとすると、
エラー:
 問題: cannot install the best candidate for the job
  - nothing provides libedit-devel(x86-64) needed by php-devel-7.4.6-1.el8.remi.x86_64
(インストール不可のパッケージをスキップするには、'--skip-broken' を追加してみてください または、'--nobest' を追加して、最適候補のパッケージのみを使用しないでください)
と出てしまいインスールできません。
古いPHPからバージョンアップしたい場合は、PHP関連のモジュールを一旦削除
# dnf remove php-*
dnfのログはこちらで確認。
# tail -f /var/log/dnf.log
起動
# systemctl restart httpd
確認
# php -v
PHP 7.4.6 (cli) (built: May 12 2020 08:09:15) ( NTS )
Copyright (c) The PHP Group
Zend Engine v3.4.0, Copyright (c) Zend Technologies
    with Zend OPcache v7.4.6, Copyright (c), by Zend Technologies
動作確認
# vi /var/www/html/phpinfo.php
<?php
phpinfo();
ブラウザで http://192.168.1.100/phpinfo.php へアクセス。
(IPアドレスは各自で設定しているもの。)
公開したくない場合は削除するか、
Basic認証をかけたディレクトリへ移動させておきましょう。
# rm -rf /var/www/html/phpinfo.php
LAMP環境構築は以上で完了です。

CentOS8でサーバー構築 - 2.Postfix+Dovecot(MTA)

CentOS7ではデフォルトでPostfixが、古いものではsendmailがインストールされていたが、
CentOS8ではPostfix、SendmailなどのMTAがインストールされておらず、する必要がある。
メールの送受信ができるようにPostfixとDovecotを使えるようにしておく。
主にサーバーサイドからの送信を目的とした設定を記載しています。
MTAとは Mail Transfer Agent の略。ネットワーク上でメールを転送・配送するソフトウェアの事。Postfix、Sendmail、qmailなど。
それに対し、ユーザ側がメールを表示・作成・送受信するソフトウェアをMUA(Mail User Agent)という。メールクライアント、メーラーと呼ばれるもの。Outlook、Thunderbird、Becky!(私はこれ使ってます)など。
使用中のMTAの確認
# alternatives --display mta mta -ステータスは自動です。 リンクは現在 /usr/sbin/sendmail.postfix を指しています。 /usr/sbin/sendmail.postfix - priority 60 スレーブ mta-mailq: /usr/bin/mailq.postfix スレーブ mta-newaliases: /usr/bin/newaliases.postfix スレーブ mta-pam: /etc/pam.d/smtp.postfix スレーブ mta-rmail: /usr/bin/rmail.postfix スレーブ mta-sendmail: /usr/lib/sendmail.postfix スレーブ mta-mailqman: /usr/share/man/man1/mailq.postfix.1.gz スレーブ mta-newaliasesman: /usr/share/man/man1/newaliases.postfix.1.gz スレーブ mta-sendmailman: /usr/share/man/man1/sendmail.postfix.1.gz スレーブ mta-aliasesman: /usr/share/man/man5/aliases.postfix.5.gz スレーブ mta-smtpdman: /usr/share/man/man8/smtpd.postfix.8.gz 現在の「最適」バージョンは /usr/sbin/sendmail.postfix です。
使用中のMTAの変更
# alternatives --config mta 1 プログラムがあり 'mta' を提供します。 選択 コマンド ----------------------------------------------- *+ 1 /usr/sbin/sendmail.postfix Enter を押して現在の選択 [+] を保持するか、選択番号を入力します:

Postfix

実際に運用するには暗号化通信、スパム対策、などの対策も必要だが、
今回はCentOS上で動作するWebアプリケーションの作製が主な目的のためとりあえず割愛。
参照:CentOS8でサーバー構築 - 7.Postfix3.3+Dovecot2.3の暗号化設定(SSL/TLS)
インストール
# dnf -y install postfix
設定
# vi /etc/postfix/main.cf
#myhostname = host.domain.tld
#myhostname = virtual.domain.tld
myhostname = mail.kowloonet.local
・省略
・
 #mydomain = domain.tld
mydomain = kowloonet.local

・省略
・
#myorigin = $myhostname
myorigin = $mydomain
・省略
・
inet_interfaces = all
#inet_interfaces = $myhostname
#inet_interfaces = $myhostname, localhost
#inet_interfaces = localhost

# Enable IPv4, and IPv6 if supported
inet_protocols = ipv4
・省略
・
#mydestination = $myhostname, localhost.$mydomain, localhost
mydestination = $myhostname, localhost.$mydomain, localhost, $mydomain
#mydestination = $myhostname, localhost.$mydomain, localhost, $mydomain,
#       mail.$mydomain, www.$mydomain, ftp.$mydomain
・省略
・
#home_mailbox = Mailbox
home_mailbox = Maildir/
・省略
・
#smtpd_banner = $myhostname ESMTP $mail_name
#smtpd_banner = $myhostname ESMTP $mail_name ($mail_version)
smtpd_banner = $myhostname ESMTP unknown
・
・下記追加

# SMTP Auth
#
smtpd_sasl_auth_enable = yes
smtpd_recipient_restrictions =
    permit_mynetworks
    permit_sasl_authenticated
    reject_unauth_destination

# Mail size limit
# 10M
message_size_limit = 10485760

# Mailbox size limit
# 1G
mailbox_size_limit = 1073741824

# OP25B
relayhost = [smtp.gmail.com]:587
smtp_use_tls = yes
smtp_sasl_auth_enable = yes
smtp_sasl_password_maps = hash:/etc/postfix/sasl_passwd
smtp_sasl_tls_security_options = noanonymous
smtp_sasl_mechanism_filter = plain
# vi /etc/postfix/master.cf
smtp      inet  n       -       n       -       -       smtpd
#smtp      inet  n       -       n       -       1       postscreen
#smtpd     pass  -       -       n       -       -       smtpd
#dnsblog   unix  -       -       n       -       0       dnsblog
#tlsproxy  unix  -       -       n       -       0       tlsproxy
submission inet n       -       n       -       -       smtpd
#  -o syslog_name=postfix/submission
#  -o smtpd_tls_security_level=encrypt
  -o smtpd_sasl_auth_enable=yes
ユーザー毎にメールボックスが作製されるように設定
# mkdir -p /etc/skel/Maildir/{new,cur,tmp}
# chmod -R 700 /etc/skel/Maildir/
既存ユーザにMaldirが存在しない場合はメールボックス作成
# mkdir -p /home/xiohei/Maildir/{new,cur,tmp}
# chmod -R 700 /home/xiohei/Maildir/
# chown -R xiohei. /home/xiohei/Maildir/
SMTP認証
# dnf -y install cyrus-sasl
# systemctl start saslauthd
# systemctl enable saslauthd
SMTP認証で使用するパスワード設定
# echo [smtp.gmail.com]:587 Gmaiのlアドレス:Gmailのパスワード > /etc/postfix/sasl_passwd
# chmod 640 /etc/postfix/sasl_passwd
# postmap /etc/postfix/sasl_passwd
OP25B対策リレーに使うGmailアカウント設定
リレー(中継)に使うGmailアカウントのセキュリティレベルを変更する必要があったため変更。
「リンクされているGoogleアカウントの重大なセキュリティ通知」のメールも飛んできました。
Gmailアカウントを管理 → セキュリティ → 安全性の低いアプリのアクセス を有効にする。
OP25:Outbound Port 25 Blocking。ISP(インターネットサービスプロバイダ)が迷惑メール対策として特定のサーバ以外からPort25をブロック。
Gmailのセキュリティ設定で中継がうまくいかない時のmailログ
# tail -f /var/log/maillog May 17 13:02:35 kowloonet postfix/smtp[9253]: 45CF0185725A: to=<送信先メールアドレス>, relay=smtp.gmail.com[64.233.189.109]:587, delay=1.8, delays=0.04/0.03/1.7/0, dsn=4.7.8, status=deferred (SASL authentication failed; server smtp.gmail.com[64.233.189.109] said: 535-5.7.8 Username and Password not accepted. Learn more at?535 5.7.8 https://support.google.com/mail/?p=BadCredentials q100sm5156446pjc.11 - gsmtp)
変更後は無事に送信できました。
# tail -f /var/log/maillog May 17 13:04:37 kowloonet postfix/smtp[9253]: 43B15185725D: to=<送信先メールアドレス>, relay=smtp.gmail.com[64.233.189.109]:587, delay=2.5, delays=0.02/0/1.7/0.86, dsn=2.0.0, status=sent (250 2.0.0 OK 1589688277 a16sm5273075pff.41 - gsmtp)
起動
# postfix check
# systemctl start postfix
# systemctl enable postfix
Created symlink /etc/systemd/system/multi-user.target.wants/postfix.service → /usr/lib/systemd/system/postfix.service.
# systemctl status postfix
● postfix.service - Postfix Mail Transport Agent
   Loaded: loaded (/usr/lib/systemd/system/postfix.service; enabled; vendor preset: disabled)
   Active: active (running) since Mon 2020-05-11 17:26:22 JST; 9min ago
 Main PID: 8383 (master)
    Tasks: 3 (limit: 4884)
   Memory: 7.6M
   CGroup: /system.slice/postfix.service
           ├─8383 /usr/libexec/postfix/master -w
           ├─8384 pickup -l -t unix -u
           └─8385 qmgr -l -t unix -u

Dovecot

インストール
# yum -y install dovecot
設定
# vi /etc/dovecot/conf.d/10-mail.conf
#  <doc/wiki/MailLocation.txt >
#
mail_location = maildir:~/Maildir
# vi /etc/dovecot/conf.d/10-auth.conf
# See also ssl=required setting.
disable_plaintext_auth = no
# vi /etc/dovecot/conf.d/10-ssl.conf
# plain imap and pop3 are still allowed for local connections
ssl = no
起動
# systemctl start dovecot
# systemctl enable dovecot
Created symlink /etc/systemd/system/multi-user.target.wants/dovecot.service → /usr/lib/systemd/system/dovecot.service.

root宛メールを一般ユーザへ転送

この場合は一般ユーザ xiohei
# sed -i '/^root:/d' /etc/aliases
# echo 'root: xiohei' >> /etc/aliases
# newaliases

メール配送の確認

Gmailなどの外のアドレス宛へメールが送信できるか確認。
mailコマンドが使えない場合はインストール。
mailxインストール
# dnf -y install mailx
メール送信
# echo testMessage| mail -s "test" 送信先メールアドレス
メールログ確認
# tail -f /var/log/maillog
May 18 07:26:42 kowloonet postfix/pickup[18628]: 6C4831857241: uid=0 from=
May 18 07:26:42 kowloonet postfix/cleanup[18829]: 6C4831857241: message-id=<20200517222642.6C4831857241@mail.kowloonet.local>
May 18 07:26:42 kowloonet postfix/qmgr[9097]: 6C4831857241: from=, size=451, nrcpt=1 (queue active)
May 18 07:26:46 kowloonet postfix/smtp[18831]: 6C4831857241: to=<送信先メールアドレス>, relay=smtp.gmail.com[64.233.189.108]:587, delay=3.9, delays=0.06/0.04/2.2/1.5, dsn=2.0.0, status=sent (250 2.0.0 OK  1589754406 ce21sm6744215pjb.51 - gsmtp)
May 18 07:26:46 kowloonet postfix/qmgr[9097]: 6C4831857241: removed
status=sent と出てればOK。
キューの確認
# postqueue -p
キューの配送
# postqueue  -i キューのID
全てのキューの配送
# postqueue  -f
キューの削除
# postsuper -d キューのID
全てのキューの削除
# postsuper -d all

CentOS8でサーバー構築 - 1.環境設定

当面は、VMWareWorkstation上で学習用、開発用、テスト用としての利用を想定に記載しています。
インストールから環境設定までは過去記事も参考にしてみて下さい。
VMware+CentOSで開発環境構築 - 1.インストール
VMware+CentOSで開発環境構築 - 2.環境設定

minimal iso からCentoOS8をインストールすると、以前とは違って、
  • GUI環境(Gnome)で立ち上がる(インストール時の選択によるので要検証)
  • postfixがデフォルトでインストールされていない
  • yumからdnfへ変更(過渡期)
  • git がデフォルトでインストールされている
など、CentOS7から変更されたものが多々あるので注意。

dnfリポジトリの修正

CentOS8からyumは廃止となり、dnfへ変更に。
コマンドyumは以前と同じように使えますが、実行しているのはdnfの模様。
インストール済みパッケージ(postfix)を調べたい時、
# dnf list installed | grep postfix
rpmコマンドでも可。
# rpm -qa | grep postfix
利用可能なパッケージ(postfix)を調べたい時、
# dnf list available | grep postfix
有効なリポジトリを表示、
# dnf repolist
また、リポジトリの設定ファイルがリポジトリ毎に分かれたみたいです。
    CentOS-AppStream.repo
    開発者用パッケージ。最新ののものはこちらへ。
    CentOS-Base.repo
    OSの動作に必要なパッケージ。
    CentOS-Extras.repo
    拡張パッケージ。
    CentOS-centosplus.repo
    拡張パッケージ。デフォルトでは無効。
日本のサーバーに向けておきます。
リポジトリ設定ファイル修正
# vi /etc/yum.repos.d/CentOS-AppStream.repo
[AppStream]
name=CentOS-$releasever - AppStream
#mirrorlist=http://mirrorlist.centos.org/?release=$releasever&arch=$basearch&repo=AppStream&infra=$infra
#baseurl=http://mirror.centos.org/$contentdir/$releasever/AppStream/$basearch/os/
baseurl=http://ftp.riken.jp/Linux/centos/$releasever/AppStream/$basearch/os/
gpgcheck=1
enabled=1
gpgkey=file:///etc/pki/rpm-gpg/RPM-GPG-KEY-centosofficial
# vi /etc/yum.repos.d/CentOS-Base.repo
[BaseOS]
name=CentOS-$releasever - Base
#mirrorlist=http://mirrorlist.centos.org/?release=$releasever&arch=$basearch&repo=BaseOS&infra=$infra
#baseurl=http://mirror.centos.org/$contentdir/$releasever/BaseOS/$basearch/os/
baseurl=http://ftp.riken.jp/Linux/centos/$releasever/BaseOS/$basearch/os/
gpgcheck=1
enabled=1
gpgkey=file:///etc/pki/rpm-gpg/RPM-GPG-KEY-centosofficial
# vi /etc/yum.repos.d/CentOS-Extras.repo
[extras]
name=CentOS-$releasever - Extras
#mirrorlist=http://mirrorlist.centos.org/?release=$releasever&arch=$basearch&repo=extras&infra=$infra
#baseurl=http://mirror.centos.org/$contentdir/$releasever/extras/$basearch/os/
baseurl=http://ftp.riken.jp/Linux/centos/$releasever/extras/$basearch/os/
gpgcheck=1
enabled=1
gpgkey=file:///etc/pki/rpm-gpg/RPM-GPG-KEY-centosofficial
# vi /etc/yum.repos.d/CentOS-centosplus.repo
[centosplus]
name=CentOS-$releasever - Plus
#mirrorlist=http://mirrorlist.centos.org/?release=$releasever&arch=$basearch&repo=centosplus&infra=$infra
#baseurl=http://mirror.centos.org/$contentdir/$releasever/centosplus/$basearch/os/
baseurl=http://ftp.riken.jp/Linux/centos/$releasever/centosplus/$basearch/
gpgcheck=1
enabled=0
gpgkey=file:///etc/pki/rpm-gpg/RPM-GPG-KEY-centosofficial
最新のパッケージに更新
# dnf -y update
そこそこ時間がかかるので、離席前などに。

開発ツールのインストール

# dnf -y groupinstall base "Development tools"

PERLのシンボリックリンク作成

# ln -s /usr/bin/perl /usr/local/bin/perl

NTPの設定

外部公開せず、内部のネットワークからのみ参照できるようにしておく。
設定
# vi /etc/chrony.conf
# Use public servers from the pool.ntp.org project.
#pool 2.centos.pool.ntp.org iburst
server ntp.nict.jp iburst
server ntp.ring.gr.jp iburst
・
・
# Allow NTP client access from local network.
allow 192.168.1.0/16
起動
# systemctl start chronyd
# systemctl enable chronyd
強制同期
# chronyc makestep
200 OK
確認
# systemctl status chronyd
● chronyd.service - NTP client/server
   Loaded: loaded (/usr/lib/systemd/system/chronyd.service; enabled; vendor pre>
   Active: active (running) since Sat 2020-05-16 14:41:59 JST; 1 day 17h ago
     Docs: man:chronyd(8)
           man:chrony.conf(5)
  Process: 1047 ExecStartPost=/usr/libexec/chrony-helper update-daemon (code=ex>
  Process: 970 ExecStart=/usr/sbin/chronyd $OPTIONS (code=exited, status=0/SUCC>
 Main PID: 975 (chronyd)
    Tasks: 1 (limit: 4884)
   Memory: 1.1M
   CGroup: /system.slice/chronyd.service
           └─975 /usr/sbin/chronyd
・
・
# chronyc sources
210 Number of sources = 2
MS Name/IP address         Stratum Poll Reach LastRx Last sample
===============================================================================
^* ntp-b2.nict.go.jp             1  10   377   31m    +11ms[  +11ms] +/-   30ms
^+ core.ring.gr.jp               2  10   377   750  +3254us[+3254us] +/-   46ms

vimの設定

# echo "alias vi='vim'" >> /etc/profile
# source /etc/profile

SSHの設定

openSSHがデフォルトでインストール済みなので、設定を変更して再起動。
実際に運用する場合はPort22は使用せず、大まかに1100番~60000の間で割り振り
攻撃を受けないようにするのをお勧めします。
設定
# vi /etc/ssh/sshd_config
# semanage port -a -t ssh_port_t -p tcp #PORTNUMBER
#
Port 22
・
・
# Logging
#SyslogFacility AUTH
SyslogFacility AUTHPRIV
#LogLevel INFO

# Authentication:
LoginGraceTime 30s
PermitRootLogin no
・
・
# To disable tunneled clear text passwords, change to no here!
#PasswordAuthentication yes
PermitEmptyPasswords no
PasswordAuthentication yes
起動
# systemctl restart sshd
# systemctl enable sshd

FTPのインストール

実際に運用するにはセキュリティを考慮する必要有。
CentOS8でサーバー構築 - 6.FTPサーバーの設定(vsftpd SSL/TLSなど)
インストール
# dnf -y install vsftpd
設定
# vi /etc/vsftpd/vsftpd.conf
# Allow anonymous FTP? (Beware - allowed by default if you comment this out).
anonymous_enable=NO
・
・
# ASCII mangling is a horrible feature of the protocol.
ascii_upload_enable=YES
ascii_download_enable=YES
起動
# systemctl start vsftpd
# systemctl enable vsftpd Created symlink /etc/systemd/system/multi-user.target.wants/vsftpd.service → /usr/lib/systemd/system/vsftpd.service.

systemctlのBash保管 (2020/06/19追記)

completionインストール
# yum -y install bash-completion
Last metadata expiration check: 0:47:01 ago on Fri 19 Jun 2020 08:05:10 AM JST.
Package bash-completion-1:2.7-5.el8.noarch is already installed.
Dependencies resolved.
Nothing to do.
Complete!

不要なサービスの停止

稼働中のサービスを調べてみて、不要だと思われるサービスは停止しておく。
稼働中のサービス
# systemctl list-units --type=service
UNIT                         LOAD   ACTIVE SUB     DESCRIPTION
accounts-daemon.service      loaded active running Accounts Service
alsa-state.service           loaded active running Manage Sound Card State (>
atd.service                  loaded active running Job spooling tools
auditd.service               loaded active running Security Auditing Service
avahi-daemon.service         loaded active running Avahi mDNS/DNS-SD Stack
chronyd.service              loaded active running NTP client/server
colord.service               loaded active running Manage, Install and Gener>
crond.service                loaded active running Command Scheduler
cups.service                 loaded active running CUPS Scheduler
dbus.service                 loaded active running D-Bus System Message Bus
dovecot.service              loaded active running Dovecot IMAP/POP3 email s>
dracut-shutdown.service      loaded active exited  Restore /run/initramfs on>
gdm.service                  loaded active running GNOME Display Manager
gssproxy.service             loaded active running GSSAPI Proxy Daemon
httpd.service                loaded active running The Apache HTTP Server
import-state.service         loaded active exited  Import network configurat>
iscsi-shutdown.service       loaded active exited  Logout off all iSCSI sess>
kdump.service                loaded active exited  Crash recovery kernel arm>
kmod-static-nodes.service    loaded active exited  Create list of required s>
ksm.service                  loaded active exited  Kernel Samepage Merging
ksmtuned.service             loaded active running Kernel Samepage Merging (>
libstoragemgmt.service       loaded active running libstoragemgmt plug-in se>
libvirtd.service             loaded active running Virtualization daemon
lvm2-monitor.service         loaded active exited  Monitoring of LVM2 mirror>
lvm2-pvscan@8:2.service      loaded active exited  LVM event activation on d>
mcelog.service               loaded active running Machine Check Exception L>
ModemManager.service         loaded active running Modem Manager
NetworkManager-wait-online.service loaded active exited  Network Manager Wai>
NetworkManager.service       loaded active running Network Manager
nis-domainname.service       loaded active exited  Read and set NIS domainna>
php-fpm.service              loaded active running The PHP FastCGI Process M>
polkit.service               loaded active running Authorization Manager
postfix.service              loaded active running Postfix Mail Transport Ag>
rngd.service                 loaded active running Hardware RNG Entropy Gath>
rpc-statd-notify.service     loaded active exited  Notify NFS peers of a res>
rpcbind.service              loaded active running RPC Bind
rsyslog.service              loaded active running System Logging Service
rtkit-daemon.service         loaded active running RealtimeKit Scheduling Po>
saslauthd.service            loaded active running SASL authentication daemo>
smartd.service               loaded active running Self Monitoring and Repor>
sshd.service                 loaded active running OpenSSH server daemon
sssd.service                 loaded active running System Security Services >
systemd-fsck@dev-disk-by\x2duuid-c902437d\x2d4f4e\x2d4040\x2d829e\x2d80db761>
systemd-journal-flush.service loaded active exited  Flush Journal to Persist>
systemd-journald.service     loaded active running Journal Service
systemd-logind.service       loaded active running Login Service
systemd-machined.service     loaded active running Virtual Machine and Conta>
systemd-random-seed.service  loaded active exited  Load/Save Random Seed
systemd-remount-fs.service   loaded active exited  Remount Root and Kernel F>
systemd-resolved.service     loaded active running Network Name Resolution
systemd-sysctl.service       loaded active exited  Apply Kernel Variables
systemd-tmpfiles-setup-dev.service loaded active exited  Create Static Devic>
systemd-tmpfiles-setup.service loaded active exited  Create Volatile Files a>
systemd-udev-settle.service  loaded active exited  udev Wait for Complete De>
systemd-udev-trigger.service loaded active exited  udev Coldplug all Devices
systemd-udevd.service        loaded active running udev Kernel Device Manager
systemd-update-utmp.service  loaded active exited  Update UTMP about System >
systemd-user-sessions.service loaded active exited  Permit User Sessions
tuned.service                loaded active running Dynamic System Tuning Dae>
udisks2.service              loaded active running Disk Manager
upower.service               loaded active running Daemon for power manageme>
user-runtime-dir@1000.service loaded active exited  /run/user/1000 mount wra>
user-runtime-dir@42.service  loaded active exited  /run/user/42 mount wrapper
user@1000.service            loaded active running User Manager for UID 1000
user@42.service              loaded active running User Manager for UID 42
vdo.service                  loaded active exited  VDO volume services
vgauthd.service              loaded active running VGAuth Service for open-v>
vmtoolsd.service             loaded active running Service for virtual machi>
wpa_supplicant.service       loaded active running WPA supplicant

LOAD   = Reflects whether the unit definition was properly loaded.
ACTIVE = The high-level unit activation state, i.e. generalization of SUB.
SUB    = The low-level unit activation state, values depend on unit type.

69 loaded units listed. Pass --all to see loaded but inactive units, too.
To show all installed unit files use 'systemctl list-unit-files'.
※postfix、dovecot、Apache、PHPインストール後に対応したので表示されています。
atd
スケジュール管理
kdump
システム異常時にメインメモリ上の内容をHDDに記録
mdmonitor
ソフトウェアRAID
# systemctl stop atd
# systemctl disable atd
# systemctl stop kdump
# systemctl disable kdump
# systemctl stop mdmonitor
# systemctl disable mdmonitor

【CentOS】覚えておきたいよく使うコマンド

CentOS7から大幅に変わり、CentOS6までの馴染みのあるコマンドが使えなくなり、未だにサクサク打てないのでメモ

サービス関連

# systemctl start httpd
# systemctl stop httpd
# systemctl restart httpd
# systemctl status httpd
# systemctl enable httpd
# systemctl disable httpd

ネットワーク関連

# nmcli d
# nmcli c modify ens33  ipv4.address 192.168.1.100/24
# nmcli c modify ens33  ipv4.gateway 192.168.1.1
# nmcli c modify ens33  ipv4.dns 192.168.1.1
# nmcli c modify ens33  ipv4.method manual ←DHCPを固定割り当てに設定
# nmcli c modify ens33  ipv4.method auto ←DHCPを自動割り当てに設定
# nmcli c down ens33; nmcli c up ens33
# nmcli d show ens33
# ip a
# systemctl restart network
# less /etc/sysconfig/network-scripts/ifcfg-ens33

ファイル操作

ファイル一覧表示
ls -la
ファイル一覧表示(パーミッションを数値で表示)
ls -la | awk 'NR>1{cmd="stat "$NF" -c %a";cmd|getline c;close(cmd);print c,$0}'
ファイル所有者変更(-Rで配下)
chown -R ユーザ名. ファイル名
ディレクトリの作製(-pで親ディレクトリが存在しない場合自作成)
mkdir -p ディレクトリ名

openssl関連

使用可能なcipher一覧表示
openssl ciphers -v | grep ECDHE | sort

ユーザ関連

メールユーザの追加(SSHログインさせない)
useradd -s /sbin/nologin ユーザ名

メモリ関連

free
free
topメモリ使用量順にソート
top
[Shift] + m