VMware+CentOS7で開発環境構築 - 3.LAMP環境構築

Linux環境において
  • Apache(WEBサーバー)のインストールと設定
  • MariaDB(データーベース)のインストールと設定
  • PHPと使いそうなPHPのモジュールのインストールと設定
LAMP環境を構築していく。

Apacheのインストールと設定

Apacheのインストール
# yum -y install httpd
インストール済みでした。。
httpd.confの設定
# vi /etc/httpd/conf/httpd.conf
ServerName に設定したドメインを記載。(ここでは kowloonet.local)
ServerName kowloonet.local:80
Options Indexes FollowSymLinks

Options Includes ExecCGI FollowSymLinks
に変更する。
Indexes
DirectoryIndexで指定したファイル(index.html)が存在しない場合、ディレクトリ内ファイルを一覧表示。
FollowSymLinks
シンボリックリンクの許可。
Includes
SSIの許可。
ExecCGI
CGIの許可。
AllowOverride All
.htaccessの許可
# Further relax access to the default document root:
<Directory "/var/www/html">
    #
    # Possible values for the Options directive are "None", "All",
    # or any combination of:
    #   Indexes Includes FollowSymLinks SymLinksifOwnerMatch ExecCGI MultiViews
    #
    # Note that "MultiViews" must be named *explicitly* --- "Options All"
    # doesn't give it to you.
    #
    # The Options directive is both complicated and important.  Please see
    # http://httpd.apache.org/docs/2.4/mod/core.html#options
    # for more information.
    #
    Options Includes ExecCGI FollowSymLinks

    #
    # AllowOverride controls what directives may be placed in .htaccess files.
    # It can be "All", "None", or any combination of the keywords:
    #   Options FileInfo AuthConfig Limit
    #
    AllowOverride All

    #
    # Controls who can get stuff from this server.
    #
    Require all granted
</Directory">
apacheのアクセスログで、不要なログが記述されないように設定。
    #
    # If you prefer a logfile with access, agent, and referer information
    # (Combined Logfile Format) you can use the following directive.
    #
    SetEnvIf Request_URI "default\.ida" no_log
    SetEnvIf Request_URI "cmd\.exe" no_log
    SetEnvIf Request_URI "root\.exe" no_log
    SetEnvIf Request_URI "Admin\.dll" no_log
    SetEnvIf Request_URI "NULL\.IDA" no_log
    #CustomLog "logs/access_log" combined
    CustomLog logs/access_log combined env=!no_log
AddDefaultCharset をコメントに
#AddDefaultCharset UTF-8
デフォルトだと、ファイルの所有者がrootなので、一般ユーザに所有者を変更。
# chown -R xiohei. /var/www/
起動
# systemctl start httpd
CentOSが立ち上がった時に起動するようにする。
# systemctl enable httpd
http://192.168.1.100
にブラウザでアクセスしてテストページが表示されるか確認。 Apache testing 123

MariaDBのインストールと設定

CentOS7からデフォルトのDBがMySQLからMariaDBに変更になったので、こちらを使う。
MySQLを使う場合はこちら→【CentOS7】MySQL8のインストール
MariaDBのインストール
# yum -y install mariadb-server
MariaDBの設定
文字コードをUTF8に指定
# vi /etc/my.cnf.d/server.cnf
#
# These groups are read by MariaDB server.
# Use it for options that only the server (but not clients) should see
#
# See the examples of server my.cnf files in /usr/share/mysql/
#

# this is read by the standalone daemon and embedded servers
[server]

# this is only for the mysqld standalone daemon
[mysqld]
character-set-server = utf8

# this is only for embedded server
起動、自動起動設定
# systemctl start mariadb
# systemctl enable mariadb
初期設定
rootのパスワードだけ入力し、他は [ENTER]
# mysql_secure_installation
NOTE: RUNNING ALL PARTS OF THIS SCRIPT IS RECOMMENDED FOR ALL MariaDB
      SERVERS IN PRODUCTION USE!  PLEASE READ EACH STEP CAREFULLY!

In order to log into MariaDB to secure it, we'll need the current
password for the root user.  If you've just installed MariaDB, and
you haven't set the root password yet, the password will be blank,
so you should just press enter here.

Enter current password for root (enter for none):
OK, successfully used password, moving on...

Setting the root password ensures that nobody can log into the MariaDB
root user without the proper authorisation.と

Set root password? [Y/n]
New password:  ←rootのパスワード入力して [ENTER]
Re-enter new password: ←rootのパスワード入力して [ENTER]
Password updated successfully!
Reloading privilege tables..
 ... Success!

接続テスト
# mysql -u root -p
Enter Password: ←設定したrootのパスワードを入力して[ENTER]

PHPのインストールと設定

デフォルトのリポジトリからのインストールではPHPのバージョンが5.6と古く、PHPのライブラリ、モジュールも揃わない事が多々あるので、最新のPHPのインストールに必要なリポジトリ先を追加してインストールする。
EPELリポジトリ
# rpm -Uvh https://dl.fedoraproject.org/pub/epel/epel-release-latest-7.noarch.rpm
Remiリポジトリ
# rpm -Uvh http://rpms.famillecollet.com/enterprise/remi-release-7.rpm
PHPのインストール
インストールするPHPのバージョンは7.1
# yum -y install --enablerepo=remi,remi-php71 php php-devel php-mbstring php-pdo php-gd php-xml php-mcrypt

Apache再起動
# systemctl restart httpd
テストページ作成
# cd /var/www/html/
# vi phpinfo.php
<?php
phpinfo();
ブラウザで
http://192.168.1.100/phpinfo.php
が表示されるか確認。
確認後削除、
# rm -rf phpinfo.php
またはファイルの所有者一般ユーザ(ここでは xiohei)に変えておく。
# chown xiohei. phpinfo.php

以上でLAMP環境構築は終了です。

VMware+CentOS7で開発環境構築 - 2.環境設定

現在Minimalでインストールしたため、必要最低限のパッケージしかインストールされていない。
(VMWareToolsをインストールしようとしたらperlすら入っていなかった。)
インターネットに繋がる状態にして必要なものをyumでインストールできる状態にする。

ネットワーク設定

CentOSインストール時の初期設定「ネットワークとホスト名」で設定した状態が反映されているか確認。
(CentOS7から大幅に変更になったため、CentOS6以前のコマンド入力に慣れていた方は不便に感じるかもしれない。)
# ip addr show
ip a show でも同じでした。
# nmcli d show
CentOSネットワーク設定
# hostname
# cat /etc/hostname
変更する必要がある場合
  • アドレス:192.168.137.100
  • Gateway:192.168.137.1
  • DNS:192.168.137.1
  • ホスト名:kowloonet.local
に変更する例
# nmcli c modify ens33 ipv4.address 192.168.137.100
# nmcli c modify ens33 ipv4.gateway 192.168.137.1
# nmcli c modify ens33 ipv4.dns 192.168.137.1
# nmcli c down ens33
# nmcli c up ens33
# nmcli g hostname kowloonet.local
(# hostnamectl set-hostname kowloonet.local でも可)
ホストのIPに繋がるか確認
# ping 192.168.137.1
外のアドレスに繋がるか確認。
# ping www.livedoor.com

初期設定

VMWare上のコンソール操作は非常にやりにくいので、PuTTY、TeraTermなどのSSHクライアントソフトからCentOSに繋がるようにして、以後SSHクライアントから操作。ネットワークの設定を終えたら、そのままでも接続できる。開発環境なので、このまま使ってもかまわないが、気持ちが悪いので、必要最低限の設定だけやっておく。クライアントの使いかたは割愛。
ファイアーウォール停止
# getenforce
Enforcing
# setenforce 0
# getenforce
Permissive
# vi /etc/sysconfig/selinux
# This file controls the state of SELinux on the system.
# SELINUX= can take one of these three values:
#     enforcing - SELinux security policy is enforced.
#     permissive - SELinux prints warnings instead of enforcing.
#     disabled - No SELinux policy is loaded.
SELINUX=disabled ← disabled に変更
# SELINUXTYPE= can take one of three two values:
#     targeted - Targeted processes are protected,
#     minimum - Modification of targeted policy. Only selected processes are protected.
#     mls - Multi Level Security protection.
SELINUXTYPE=targeted
# systemctl stop firewalld
# systemctl disable firewalld
rootになれるユーザの管理
# usermod -G wheel xiohei
# vi /etc/pam.d/su
#%PAM-1.0
auth            sufficient      pam_rootok.so
# Uncomment the following line to implicitly trust users in the "wheel" group.
#auth           sufficient      pam_wheel.so trust use_uid
# Uncomment the following line to require a user to be in the "wheel" group.
auth            required        pam_wheel.so use_uid ←コメント削除
auth            substack        system-auth
auth            include         postlogin
account         sufficient      pam_succeed_if.so uid = 0 use_uid quiet
account         include         system-auth
password        include         system-auth
session         include         system-auth
session         include         postlogin
session         optional        pam_xauth.so
root宛のメールを一般ユーザで受け取る
# sed -i '/^root:/d' /etc/aliases
# echo "root: xiohei" >> /etc/aliases
# newaliases
稼働中のサービスの表示
# systemctl list-units --type=service
systemctl - centos
Kdumpはメモリが1G以上無いと動かないようで、使わないので止めておく。
# systemctl disable kdump
定義されているサービスの表示
# systemctl list-unit-files --type=service
systemctl - centos
サービスの状態を表示
# systemctl status sshd
パッケージアップデート
# yum -y update
・
・
Cannot find a valid baseurl for repo: base/7/x86_64
と出てしまったので、設定を見直し。ついでに日本のミラーサイトをみるように変更。
# vi /etc/yum.repos.d/CentOS-Base.repo
mirrorlist= の行をコメントにし
baseurl=http://ftp.riken.jp/Linux/centos/~
を[base]、[updates]、[extras]、[centosplus]に追加
[base]
name=CentOS-$releasever - Base
#mirrorlist=http://mirrorlist.centos.org/?release=$releasever&arch=$basearch&repo=os&infra=$infra
#baseurl=http://mirror.centos.org/centos/$releasever/os/$basearch/
baseurl=http://ftp.riken.jp/Linux/centos/$releasever/os/$basearch/
gpgcheck=1
gpgkey=file:///etc/pki/rpm-gpg/RPM-GPG-KEY-CentOS-7

##released updates
[updates]
name=CentOS-$releasever - Updates
#mirrorlist=http://mirrorlist.centos.org/?release=$releasever&arch=$basearch&repo=updates&infra=$infra
#baseurl=http://mirror.centos.org/centos/$releasever/updates/$basearch/
baseurl=http://ftp.riken.jp/Linux/centos/$releasever/updates/$basearch/
gpgcheck=1
gpgkey=file:///etc/pki/rpm-gpg/RPM-GPG-KEY-CentOS-7

#additional packages that may be useful
[extras]
name=CentOS-$releasever - Extras
#mirrorlist=http://mirrorlist.centos.org/?release=$releasever&arch=$basearch&repo=extras&infra=$infra
#baseurl=http://mirror.centos.org/centos/$releasever/extras/$basearch/
baseurl=http://ftp.riken.jp/Linux/centos/$releasever/extras/$basearch/
gpgcheck=1
gpgkey=file:///etc/pki/rpm-gpg/RPM-GPG-KEY-CentOS-7

#additional packages that extend functionality of existing package
[centosplus]
name=CentOS-$releasever - Plus
#mirrorlist=http://mirrorlist.centos.org/?release=$releasever&arch=$basearch&repo=centosplus&infra=$infra
#baseurl=http://mirror.centos.org/centos/$releasever/centosplus/$basearch/
baseurl=http://ftp.riken.jp/Linux/centos/$releasever/centosplus/$basearch/
gpgcheck=1
enabled=0
gpgkey=file:///etc/pki/rpm-gpg/RPM-GPG-KEY-CentOS-7
# yum -y update
開発ツールのインストール
# yum -y groupinstall base "Development tools"
少々お時間かかります。
perlも無事に入ったので、
PERLのシンボリックリンク作成
# ln -s /usr/bin/perl /usr/local/bin/perl
mailコマンドが使えるようになったので、root宛のメールの転送テスト。
# echo tesMmessage|mail root
# mail
Heirloom Mail version 12.5 7/5/10.  Type ? for help.
"/var/spool/mail/xiohei": 1 message 1 unread
>U  1 root                  Sat Sep 16 10:13  18/562
& 1 ← 1 ENTER でメールの内容を表示
Message  1:
From root@kowloonet.local  Sat Sep 16 10:13:05 2017
Return-Path: 
X-Original-To: root
Delivered-To: root@kowloonet.local
Date: Sat, 16 Sep 2017 10:13:05 +0900
To: root@kowloonet.local
User-Agent: Heirloom mailx 12.5 7/5/10
Content-Type: text/plain; charset=us-ascii
From: root@kowloonet.local (root)
Status: RO

testMessage

& quit ← quit [ENTER]で抜ける
Held 1 message in /var/spool/mail/xiohei
メールが /var/spool/mail/xiohei にあります

vimの設定

最終行に「alias vi='vim'」を追加
# vi /etc/profile
done

unset i
unset -f pathmunge

alias vi='vim'
# source /etc/profile

VMWareToolsのインストール

CDマウント
# mkdir /mnt/cdrom
# mount /dev/cdrom /mnt/cdrom
mount: /dev/sr0 is write-protected, mounting read-only
# cp /mnt/cdrom/VMWareTools-10.1.6-5214329.tar.gz /tmp/
# cd /tmp
# tar zxvf VMWareTools-10.1.6-5214329.tar.gz
# umount /mnt/cdrom
# cd vmware-tools-distrib/
このままでは、VMwareToolsをインストールできない(できなかった)ので
  • kernel-devel
  • policycoreutils-python (semanag コマンドが必要なためこれを入れる)
を入れておく。
# yum -y install kernel-devel
# yum -y install policycoreutils-python
# ./vmware-install.pl

NTPの設定

# vi /etc/chrony.conf
# Use public servers from the pool.ntp.org project.
# Please consider joining the pool (http://www.pool.ntp.org/join.html).
# server 0.centos.pool.ntp.org iburst
# server 1.centos.pool.ntp.org iburst
# server 2.centos.pool.ntp.org iburst
# server 3.centos.pool.ntp.org iburst
server ntp.nict.jp iburst ←追加
server ntp.ring.gr.jp iburst ←追加
server time.google.com iburst ←追加

# Record the rate at which the system clock gains/losses time.
driftfile /var/lib/chrony/drift

# Allow the system clock to be stepped in the first three updates
# if its offset is larger than 1 second.
makestep 1.0 3

# Enable kernel synchronization of the real-time clock (RTC).
rtcsync

# Enable hardware timestamping on all interfaces that support it.
#hwtimestamp *

# Increase the minimum number of selectable sources required to adjust
# the system clock.
#minsources 2

# Allow NTP client access from local network.
#allow 192.168.0.0/16
allow 192.168.1.0/24 ←追加
# systemctl start chronyd
# systemctl enable chronyd
# systemctl status chronyd
# date

VMware+CentOS7で開発環境構築 - 1.インストール

windows上に仮装マシンであるVMware Workstation Playerをインストールして
Linuxの開発環境(テスト環境、学習用等)を作る。
ホストOSwindows10 64bit
仮装マシンVMware Workstation 12.5.7 Player (無償)
ゲストOSCentOS7

VMware Workstation Playerのインストール

下記URLから
VMware Workstation 12.5.7 Player for Windows 64-bit Operating Systems.
をダウンロード
https://my.vmware.com/jp/web/vmware/free#desktop_end_user_computing/vmware_workstation_player/12_0
※最新版はこちらで確認してください⇒ VMware Workstation Player の試用
VMWareダウンロード
インストーラが起動したら
「拡張キーボード ドライバ(この機能をインストールするには再起動が必要)」
にチェックを入れて、進みインストール。

CentOS7のダウンロード

https://www.centos.org/download/
Minimal ISOを選択
CentOSダウンロード
ダウンロードサイトがいくつか出てくるので、速そうな理研などからダウンロード。

VMWareにCentOSをインストール

VMWareを起動して
「新規仮想マシーンの作成」
新規仮想マシン作製-VMWareにCentOSをインストール
「インストーラ ディスク イメージ ファイル」で先程ダウンロードしたCentOS ISOファイルを選択
仮想マシン名は
「CentOS7」
にしました。
ディスク容量の指定-VMWareにCentOSをインストール
ディスク最大サイズ「8G」に設定。
「仮想ディスクを単一ファイルとして格納」にチェック
特にこだわりがなければ「複数のファイルに分割」で構いません。
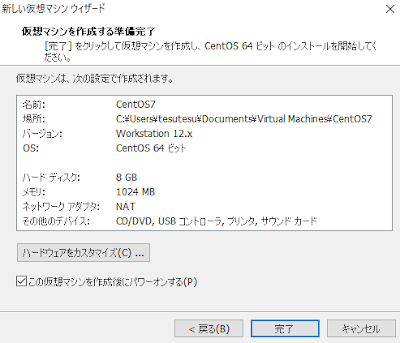
仮装マシンを作成する準備完了-VMWareにCentOSをインストール
次の画面で[ハードウェアをカスタマイズ]をクリック
ハードウェア-VMWareにCentOSをインストール
この仮想マシンのメモリを「512MB」に変更。
ハードウェア-VMWareにCentOSをインストール
ネットワーク アダプタ「NAT」から「ブリッジ:物理ネットワークに直接接続」を選択。
「物理ネットワーク接続の状態を複製」にチェックをして、閉じる、完了
CentOSのインストールが開始され、toolsのダウンロードも聞かれるのでダウンロードしておく。
CentOS7-VMWareにCentOSをインストール
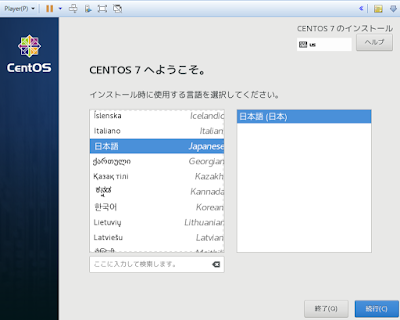
しばらくすると。
このような画面になるので、CentOSの初期設定など、メモリ512MBでもGUIで初期設定ができる。
CentOS7へようこそ-VMWareにCentOSをインストール
GUIで設定できるところはやっておいが方が楽かもしれない、

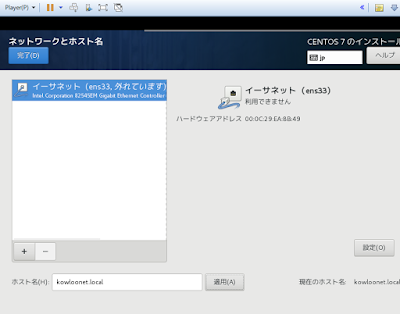
「ネットワークとホスト名」
ネットワークとホスト名-VMWareにCentOSをインストール
[設定]
「全般」タブ
全般-VMWareにCentOSをインストール
「この接続が可能になった時は自動的に接続する」にチェック
「IPv4のセッティング」タブ
IPv4のセッティング-VMWareにCentOSをインストール
方式:「手動」
アドレス [追加]
アドレス:192.168.1.100
サブネットマスク:255.255.255.0
ゲートウェイ:192.168.1.6 (一般的にはルーターなどのIPアドレス192.168.1.1など)
DNSサーバー:192.168.1.6 (一般的にはルーターなどのIPアドレス192.168.1.1など、もしくはgooglePublicDNS 8.8.8.8)
「IPv6のセッティング」「無視する」
[保存]
ネットワークとホスト名-VMWareにCentOSをインストール
ホスト名:kowloonet.local [適用][完了][インストール開始]
ユーザの設定 ROOTのパスワードの設定、ユーザの作成をしてインストールが終るのをしばらく待つ
ユーザの設定-VMWareにCentOSをインストール
「再起動」
コンソール画面-VMWareにCentOSをインストール
無事、インストール完了

【jQuery】フォーム操作(nameで指定)

idが不特定でnameを指定して値を挿入・選択させる場合の書き方
text
$('input[name="' + param_name + '"]').val(param_value);
$(':text[name="' + param_name + '"]').val(param_value).trigger('change'); ←トリガー発動
※:text, :radio を使うと動作が重くなるのでお勧めしない
select
$('select[name="' + param_name + '"]').val(param_value);
radio
$('input[name="' + param_name + '"]').val([param_value]);
$(':radio[name="' + param_name + '"]').val([param_value]);
※valの中は [ ] でくくる
$('input[name="' + param_name + '"][value="' + param_value + '"]').prop('checked', true);
最初のやつ選択
$('input[name="' + param_name + '"]:first').prop('checked', true);
クリア
$('input[name="' + param_name + '"]').prop("checked", false);
checkbox
~配列で渡す場合、値のないものはチェックが外れる~
$('input[name="' + param_name + '"]').val(param_value_Array);
$('input[name="' + param_name + '"]').val([param_value,param_value,param_value]);
~ひとつづつ該当のものにチェックする場合~
$('input[name="' + param_name + '"][value="' + param_value + '"]').prop('checked',true);
textarea
$('textarea[name="' + param_name + '"]').val(param_value);
値取得
$('input[name="' + param_name + '"]:checked').val()
使用例
pendding